Sunday, August 26, 2012

Homemade Beef Jerky

My boys love jerky, but I don't love the cost of it.  I always find it so expensive to pay close to $5 for a small bag that is half empty anyway.

So, I make my own at home, which is really easy to do, much cheaper, and you can get the flavor you want.

This is the first jerky recipe I tried, back when I was making it for the first time and scared of messing it up, not knowing how to season it properly.  Totally ridiculous because you can season it however you like.....I've made Teriyaki, Spicy, Jalapeno, BBQ, you name it.

The best cut that I've found is the Beef Top Round.  Just slice it really thin while it's still semi frozen.  I also like using the thin sliced different cuts of meat I get at the local Asian Market.  Just experiment with different types of cuts.

Homemade Beef Jerky

Easy Homemade Beef Jerky

2 lbs of beef
1 cup soy sauce
1/2 cup water
1/2 tablespoon ground black pepper
3 cloves of garlic
1 tablespoon honey
liquid smoke (you only need a drop or so, it's very strong)
garlic powder
onion powder
1 jalapeno pepper


Slice the jalapeno pepper up.  Be careful please, use gloves and wash hands very well afterwards.  You don't need to be precise, just rough slice it up and add it to a bowl.

Grate in the garlic cloves.   Add the rest of the ingredients and mix well, then add in the sliced beef.

Give it all a good stir, then pour into a ziploc bag and refrigerate overnight.

The next morning, lay out the beef strips on your dehydrator trays.  Crack a little bit more black pepper on top and set it on LOW for 6 or 7 hours.

My dehydrator is really old, it doesn't have a low or high setting, just an on/off button.  I turn it on and walk away for 6 hours or so.

Check on it often, rotate the trays.  Remember that the outer edges dry quicker than the inner ones.  If need be rotate the beef pieces as well, move the outer ones to the inside and the inside ones to the other edges to dry.

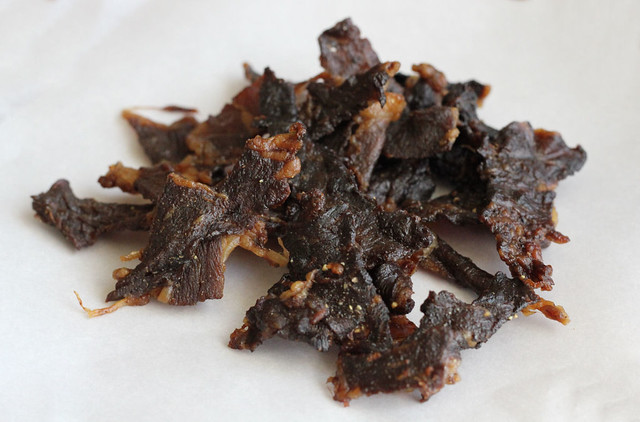
When done, remove the jerky and enjoy :)


Wednesday, August 22, 2012

Homemade Buttermilk Bread

Another great way to fix some homemade loaves.  I love buttermilk bread and this comes out just right :)

If you don't have buttermilk, you can mix 1 cup of milk with 1 tablespoon of vinegar, to get the same effect.

These were the last of the loaves that I baked today.  I have lots of bread for sandwiches and for the freezer as well :)

Buttermilk Bread

Homemade Buttermilk Bread
  • 1 cup water
  • 3 tbsp butter
  • 1/2 cup warm water
  • 1 package active dry yeast
  • 1 cup buttermilk or 1 cup water and 4 tbsp buttermilk powder
  • 2 tbsp honey
  • 1 tbsp sugar
  • 1 tbsp salt
  • 1/2 tsp apple cider vinegar
  • 6 cups bread flour

Preparation:

  1. In small saucepan, heat 1 cup water and 3 tbsp butter over medium heat until butter is melted. Remove from heat and allow to cool until warm.

  2. In small bowl, add 1/2 cup warm water and the dry yeast. Stir yeast until it is dissolved. Set bowl aside and continue with the next step.

  3. In large bowl, mix buttermilk, honey, sugar, salt, and vinegar. When the butter water is warml to the touch, pour into large bowl. Add yeast water.

  4. Begin adding bread flour one cup at a time. When the dough is too stiff to mix with the wooden spoon, about 5 cups, turn out onto a floured board.

  5. Knead in the remaining flour until the dough is firm and smooth. Put dough in a buttered bowl and flip dough so that the top of it is lightly buttered. Cover and let rise until double in size, about 45 to 60 minutes.

  6. Punch down dough and turn out onto floured board. Knead bubbles out of dough. Divide dough into to equal halves.

  7. Preheat oven 375 degrees F. Form dough into two loaves. Place in buttered bread pans. Cover and let rise until double in size, about 30 to 45 minutes.

  8. Melt 1 tbsp of butter. Brush butter on to bread tops. Using a sharp knife, make three light slashes across the bread tops. Place in oven and bake for 45 minutes or until golden brown. Remove from pans and let cool on a rack or dishtowel.

Four Loaf White Bread

Here is the recipe for the White Bread loaves I baked today.

I made 3 loaves of the white and then turned the 4th into Cinnamon Raisin Bread.  This bread is fantastic, easy to make and freezes really well too.

White Bread

Four Loaf White Bread

Ingredients:

  • 1-1/2 Tbsp active dry yeast
  • 3/4 cup warm water, 95 to 110 degrees F
  • 2-2/3 cups warm water, 95 to 110 degrees F
  • 1/4 cup sugar
  • 1 Tbsp salt
  • 3 Tbsp shortening
  • 9 to 10 cups bread flour, about

Preparation:

  1. In large bowl, dissolve yeast with 3/4 cup warm water. Add the remaining amount of warm water, sugar, and salt. Stir until dissolved. Add shortening and 4 cups of flour. Mix well. Slowly add the remaining amount of flour until dough is formed. You may or may not use the full amount of flour.

  2. Turn dough out onto floured board. Knead dough for about 10 minutes, adding more flour by the tablespoon, if necessary. Grease a large bowl. Put the bread dough into the bowl and then turn the dough over so that the top of the dough is greased. Cover the bowl with a clean kitchen towel and let the dough rise at room temperature until double in size or about 1 hour.

  3. Punch down dough. Turn it out onto a floured board and knead out all the bubbles for about 5 minutes. Divide the dough into four equal parts. Form each quarter into a loaf by rolling the dough into a rectangle. Roll the dough up like a jellyroll. Pinch seam closed. Pinch and tuck edges under the loaf. Preheat oven to 375 degrees F. Grease 4 loaf pans or two baking sheets. Spread a light layer of yellow cornmeal on the loaf pans or baking sheets, if desired. Set loaves in 9 x 5-inch pans or two loaves on each baking sheet, cover with clean kitchen towel, and allow to rise until double in size or for about a half hour. If desired, beat the white of one medium egg and a tablespoon of water in a small bowl. Brush egg white on top of loaves after they have risen. Sprinkle tops with poppy or sesame seeds.

  4. Bake breads for about 45 minutes or until golden brown. Remove breads from oven and turn out loaves onto rack. Allow loaves to cool completely before freezing.

For the cinnamon raisin bread. I prefer to have the sugar/cinnamon/raisin mixture inside and not in the dough. I have some family members that do not like raisins and this is much easier for them to remove.

Cinnamon Raisin Bread

Great as toast for breakfast.

Cinnamon Raisin Bread

Fluffy Dinner rolls

It's baking day at my house, which means I start early morning and don't leave the kitchen until well after lunch, when all the bread is baked, cooling down and then all that is left is to wrap and freeze.

Fluffy Dinner rolls

Today I baked up 3 loaves of white bread, 2 loaves of buttermilk bread, 2 loaves of cinnamon raisin bread and a dozen fluffy dinner rolls.

I'll be giving you the recipes for these, but first, I'm starting with the rolls.  I made similar ones just the other day but this recipe is WAY better and they always rise really high and fluffy.  They are just amazing.

The original recipe comes from Jamie Cooks it Up.

And if you want to learn a simple but fail proof way of always getting your rolls nice and round, watch this video that shows you how to roll the bread the Amish way.  

Fluffy Dinner rolls

Fluffy Dinner Rolls

3/4 - cup milk
4 - tablespoons butter
3/4 - cup hot water
4 - tablespoon sugar
1 - teaspoon salt
4 - 4 1/2 - cup flour
1 - heaping tablespoon instant yeast


1. Pour your milk into a microwave safe container. Add your butter to the milk and put it in the microwave for 1 1/2 minutes.
2. While the milk warms preheat your oven to 170 degrees. Turn on the tap to get your water nice and hot. Temperature is important to making these rolls rise quickly. Put your hand in the water to test it. You want it to be just on the edge of unpleasant.
3. Put your milk/butter and hot water in the bottom of your Kitchen Aid Mixer. Add the sugar and salt. Then add 2 cups of flour...let it mix for 1 minute.
4. Add the yeast. Turn the mixer on and add the rest of the flour 1 cup at a time.
5. You have enough flour when the dough scrapes the side of the bowl clean. Mix on medium speed for 5 minutes.
6. Cover with plastic wrap and let sit for 5 minutes. You need the plastic wrap to trap the heat.
7. Take a stick of butter and coat the inside of a 9x13 pan.
8. Spray your counter, or a cutting board with cooking spray. Lay your dough on top of it.
9. Take a sharp knife, spray it with cooking spray and cut your dough into 12 pieces. Make them as equal as you can.
10. Gently round them into balls, and put them in your buttered 9x13 pan.

Fluffy Dinner rolls

11. Put the pan into your warm 170 degree oven. Let them rise for about 20 minutes or until they have risen about 1 inch above the rim of the pan.
12. Leave your pan in the oven and turn the heat up to 350 degrees. Bake for 15 minutes. This time includes the time it takes the oven to increase in temperature. Bake until golden brown.

Fluffy Dinner rolls

13. Brush with a little softened butter and serve warm.

They make yummy little sandwiches too, which is what I'm having for lunch :)

Fluffy Dinner rolls

Monday, August 20, 2012

Cucumber Kimchi

There's this Korean BBQ place right around the corner from our base.  We usually go and get their Beef Bulgogi which is amazing, but quite pricey, so it's something we don't do very often :)

Aside from the Bulgogi, their Kimchi is phenomenal too, but by far, my favorite is the Cucumber Kimchi.  Yum!

I have wanted to make my own since the first time I tried it, so I asked around and one of my Asian friends told me how she makes it.   If all else fails, you could also use the Kimchee Base which you can find in little bottles at your local Asian Food Stores.

I make it both ways and it's equally delicious. 

Cucumber Kimchi

Cucumber Kimchi

3 Cucumbers
1/2 Bundle of Chives
1T Minced Garlic
1t Minced Ginger
1T Chopped Green Onion
2/3 Cup Korean Chili Powder
1t Salt
1T Sugar

1. Cut the cucumbers into 4cm lengths.
2. Slit-cut the cucumber sections lengthwise, leaving about 1cm on end and make 4 slits.
3. Add salt to water and boil water.
4. Put the cucumbers in a bowl and pour hot salty water in it.
5. Drain water after 30 mins.
6. Chop chives into 1cm length.
7. Add minced garlic, minced ginger, chilly powder, sugar, and salt to chives and mix them well.
8. Fill the slit-cut cucumbers with the mix and stack the stuffed cucumbers in a container.
9. Keep the cucumber container outside in a room temperature for a day.
10. Move it to the refrigerator and serve it cold.

Cucumber Kimchi

Friday, August 17, 2012

Ginger Syrup for Homemade Ginger Ale

We don't drink much soda in my home, matter of fact the only time we really have any is if we're out to dinner or lunch, and even then most of the time we either get iced tea or water.

But we do love Ginger Ale.

2012_08170017

I have always loved fresh ginger, there is nothing like the aroma that unleashes the minute you start slicing into that root, and ginger is SO good for you too.

This is a simple Ginger Syrup that you can keep refrigerated and make individual servings of ginger ale whenever you have that craving.  May I suggest you make a double batch of this recipe, because if you love it as much as we do, one will not suffice :)

The recipe comes from the great Imbibe Magazine.

Ginger Syrup

Ginger Syrup


2 cups unpeeled, washed, fresh ginger, roughly chopped
2 cups sugar
6 cups water

Process ginger chunks in a food processor or blender until finely chopped. Place in a large stock pot. Add sugar and water to the pot and stir. Bring to a boil then reduce to a simmer over medium-low heat and cook for one hour until a rich syrup is created. Strain the syrup twice through cheese cloth or a sieve into a large jar or bottle. Refrigerate.

Homemade Ginger Ale

To make ginger ale, simply fill an ice-filled glass a third of the way with the syrup, top with soda water and a squeeze of lime, stir and enjoy.

Ginger Syrup

Ginger Syrup

Now don't throw out the ginger pieces.....you can use those to make candied ginger, which is super easy.

Ginger Syrup

Line a small sheet pan with wax or parchment paper, or with tinfoil. Spread about 1/4 cup sugar. Remove the ginger from the cheesecloth, and place it on the pan.

Toss it with the sugar and then spread into a thin layer. Let dry for several hours, or overnight.

Ginger Syrup

Wednesday, August 15, 2012

Crockpot Sausage Rigatoni

Super super simple meal to get on the table.  This has to be one of the fastest crockpot recipes I make.

Crockpot Sausage Rigatoni

Not much more to say other than, go and make it and enjoy a nice big plate of pasta :)


Crockpot Sausage Rigatoni

Crockpot Sausage Rigatoni

  • 1 pound sweet italian turkey sausages, casings removed and crumbled (I've made it using maple sausage too, it's good)
  • One 26- to 28- ounce jar tomato pasta sauce
  • 1 pound rigatoni, uncooked
  • Freshly grated or shredded Parmesan cheese for serving

Coat the slow cooker with nonstick cooking spray.

In a medium-size skillet over medium-high heat, brown the sausage.

While the sausage is cooking, pour the pasta sauce into the cooker. Fill the empty jar with water and pour it into the cooker. Add the rigatoni and cooked sausage; gently stir with a
rubber spatula to combine well. Cover and cook on LOW until the pasta is tender, 31/2 to 4 hours. Stir once halfway through cooking.

Do not cook more than 4 hours because the sides will dry out and burn. Serve immediately sprinkled with Parmesan cheese.


Crockpot Sausage Rigatoni

Tuesday, August 14, 2012

Portuguese Chicken Spaghetti

I know that when some think of Chicken Spaghetti, they are thinking of cream of something soups and peppers and other stuff like that....but this nothing like it.

Galinha com Espargete

This recipe takes me right back to my childhood.  I can just remember hearing my dad or stepmom yell out "COMER".  Which means "EAT".  That was the signal sent out to every household member to make their way to the dining table.  And when I say every member, trust me, I mean like 12, 13, 14 people.

We're Portuguese, eating is one of our favorite things, and sitting around a huge table with family sharing a good meal, a glass of wine and conversation is one of my fondest childhood memories.  (Wine wasn't for me obviously lol).

Anyway, I'm sure everyone has their way of making this dish...but this is how I prepare mine.

Galinha com Espargete

Portuguese Chicken Spaghetti


1 lb chicken thighs, skin removed and cut into bite size chunks (you can use breasts as well, or chicken legs, or even a whole chicken, up to you)
Olive oil
Garlic
Small onion, diced

salt and pepper
Small can of tomato sauce
Carrots, sliced
Spaghetti (enough for your family, I usually make about half of a package)


In a pot, add a little bit of olive oil.  I don't measure anything when I cook, but I guess about a tablespoon or so.  Add the garlic and the onion and cook on low heat until the onion is transparent.

Add the chicken pieces, season with salt and pepper.  Add the can of tomato sauce and some sliced carrots and cook over medium heat until chicken is cooked completely, and carrots are tender.  Make sure to give it a stir once in a while and keep adding a little water so it doesn't stick or burn.

When chicken is cooked, add in about 2 cups of water, and in goes your spaghetti.  Give it a good stir and check on it often until spaghetti is cooked to your liking.  If it's too watery, just pop the lid on and let it cook for a few minutes longer to absorb some of the liquid.

That's it.  Simple but my kids LOVE this stuff :)

Galinha com Espargete

Menu Plan

Just finished getting the new Menu Plan together.

The next two weeks are all about my favorite dishes. There won't be any new recipes, but I'm going back to the very beginning of my blog, and remaking family favorites, retaking new photos and editing posts.

Can't wait to eat these delicious meals again :)


BREAKFAST: Toast with Jam, Juice, Coffee
LUNCH: Chicken Nuggets, Mac and Cheese, Iced Tea
DINNER:  Have to get groceries late in the day, so we're heading out to dinner at Buca Di Beppo. 


BREAKFAST:  Muffins, Milk
LUNCH: Cheese and Ham Sandwiches, Fruit
DINNER:  Galinha com Pimentos e Arroz - Chicken with green peppers and rice


BREAKFAST: Toasted Raisin Bread w/ Butter, Orange Juice
LUNCH: Chicken Salad
DINNER: Chicken Fried Steak, Mashed Potatoes and Gravy


BREAKFAST: Homemade Vanilla Waffle, milk, coffee
LUNCH: Tortilla Chips and Homemade Salsa
DINNER: Spaghetti Pizza Pie


BREAKFAST: Bacon, Sausage, Eggs
LUNCH: Sandwiches, Chips
DINNER: Beef Curry


BREAKFAST: Cereal, Milk
LUNCH:  English Muffin Cheese Pizzas
DINNER: Chicken and Sausage Ragu


BREAKFAST: Cinnamon Rolls, Orange Juice
LUNCH: Grilled Cheese and Tomato, Strawberries with Whipped Cream
DINNER: Texas BBQ Burgers


BREAKFAST: Oatmeal, Milk

LUNCH: Ravioli, Salad
DINNER:  Fettucine Alfredo 


BREAKFAST:  Pancakes, Juice
LUNCH: Cheese Quesadillas
DINNER:  Homemade Pizza


BREAKFAST: Cinnamon Toast, Juice
LUNCH: Salad for me...Hot pockets & veggies for the kids
DINNER: Bratwurst, Tater Tots


BREAKFAST: Homemade Hash Browns, Bacon
LUNCH: Pizza

DINNER: Steaks with Pepper Sauce and Homemade Fries


BREAKFAST: Biscuits and Gravy
LUNCH: Sandwiches, Chips

DINNER: Roast Chicken, Roast Potatoes


BREAKFAST: Cereal, Milk
LUNCH:  Mac and Cheese for kids, Sandwich for me
DINNER: Lasagna


BREAKFAST: Muffins, Juice, Coffee
LUNCH: Hotdogs
DINNER: Chicken Pot Pie


BREAKFAST: Oatmeal, Milk

LUNCH: Taquitos, Veggies

DINNER:  Spaghetti with Bacon 


BREAKFAST:  Pancakes, Juice

LUNCH: Sandwiches

DINNER:  Fish Cakes and Butter Garlic Potatoes


Thursday, August 09, 2012

Easy Dinner Rolls

Love bread.  Would eat fresh baked bread every day, if it didn't go straight to my stomach and my hips.  Bummer.

Dinner Rolls

But there really is nothing like fresh baked hot bread with melted butter dripping off the top.  *drool*

So this is a quick recipe to put together, in about an hour you'll have delicious fluffy dinner rolls.  I have quite a few roll recipes but I just love these, and thanks again goes to A Feast for the Eyes for another great recipe :)

Dinner Rolls

Dinner Rolls

¼ cup low-fat milk
⅛ cup sugar
1 teaspoon salt
1-½ tablespoons butter
1-½ packages (or 3-1/2tsps.) of dry active yeast
¾ cups warm water (105F – 115F)
2-½ to 3 cups all-purpose flour
2 tablespoons butter, melted (optional for brushing onto baked rolls)


I like to use my oven as an “incubator”, which hastens the proofing of the dough. I simply turn my oven to WARM for a few minutes, then shut it off.

Dissolve the yeast in warm water and the sugar until it foams (5-10 minutes).

In the meantime, melt the butter in the microwave, then the milk. Combine and allow to cool to about 110F. (You could use a saucepan, but the microwave is much easier for me— I use 25 second increments.)

Dinner Rolls

Dump the milk and yeast mixture into the mixing bowl. Add about 2-½ cups flour and mix with the dough hook. (Or, beat by hand). Mix for about a minute. With the mixer still going, add the remaining flour, a bit at a time and mix for another couple of minutes, or until the dough starts to clean the sides of the bowl. (I used 3 cups of flour, total). Knead on low speed for about 2 more minutes, or until dough is smooth and elastic – the dough will still be slightly sticky to the touch.

Place dough in a lightly oiled bowl, turning it to grease the top. Cover the dough with a clean, dry dish towel, (or plastic wrap) and let it rise in a warm place, free from draft (or in the incubated oven), for about 20 minutes.

Turn the dough onto a lightly floured surface, and gently shape into a square. Divide into 9 or 12 pieces. I shape each roll by pulling them into a more circular shape then grab corners to the center and twist. Place the ball on a lightly floured surface, twist side down and gently grab and roll into a round ball. You can also make 27 or 24 small balls and make “clover leaf rolls”. You then place3 mini dough balls into a greased muffin cup. Cover the rolls with the dish towel, and let the dough rise for about 15 minutes.

Meanwhile, preheat the oven for 425ºF. Bake for about 12 minutes or until the rolls are golden brown. Remove from pans immediately, and brush with 2 Tablespoons melted butter, immediately. Cool on a wire rack, and you can eat these within just a few minutes.

Dinner Rolls

Texican Chili

I have so many different chili recipes, and I enjoy trying the variations on such a popular dish.

This one however, I had never tried before but it's pretty good and smells amazing while it's cooking.

The recipe comes from my very old Fix it and Forget Cookbook.

Texican Chili

Texicali Chili

8 bacon strips, diced
2 1/2 lbs. beef stewing meat, cubed
28 oz can stewed tomatoes
14 1/2 oz can stewed tomatoes
2 8z. cans tomato sauce
16 oz can kidney beans, rinsed and drained
2 cups sliced carrots
1 medium onion, chopped
1 cup chopped celery
1/2 cup chopped green pepper
1/4 cup minced fresh parsley
1 Tbsp. chili powder
1 tsp. salt
1/2 tsp. ground cumin
1/4 tsp. pepper


Cook bacon in skillet until crisp. Drain on paper towel.

Brown beef in bacon drippings in skillet.

(I skip the skillet because my crockpot's bowl can be used on the stove top, so I just do everything in there and then transfer it to the base.)

Texican Chili

Combine all ingredients in slow cooker.

Texican Chili

Cover. Cook on low 9 to 10 hours or until meat is tender. Stir occasionally.

Texican Chili

Linking up at Foodie Friends

Wednesday, August 08, 2012

Bacon Wrapped Chicken

So this one is quite similar to the popular Sweet and Spicy Bacon Chicken....but it's slightly different and equally good.

Instead of the brown sugar, we are smearing on some chive and onion cream cheese before wrapping it in bacon.   The result is fantastic.

Bacon Wrapped Chicken

Bacon Wrapped Chicken
2 servings


boneless skinless chicken breasts, flattened to 1/2 inch thickeness
salt
pepper
Chive and onion flavored cream cheese

2 Slices of bacon


Sprinkle chicken with the salt and pepper.    Flatten the chicken breasts, then spread a little bit of the chive and onion cream cheese on it.  Roll them up, and wrap a slice of bacon around it.

Place the chicken seam side down on a baking dish, bake at 375 degrees until chicken is cooked.  When done, pop under the broiler for a few seconds to crisp the bacon.

Bacon Wrapped Chicken

Linking up at Foodie Friends