Tuesday, November 07, 2017

{ Christmas Fruit Cake }


 It's that time of the year.  By now, if you're going to be making Fruit Cakes for Christmas, you need to start baking them or at the very least figuring getting all your ingredients ready to go.  The sooner you make them, the better they turn out.

I actually made my first in October, and today I made another two.  I'm using a completely different recipe, one which I got from one of my favorite vloggers Helen from Wright At Home on Youtube.

This is her grandmother's recipe, and I truly believe that the best recipes are those handed down from generation to generation.  Too often I see people trying to create shortcuts or substitute this for that ingredient in an attempt to make things more glamorous, but it doesn't always turn out well.  It's been my experience that the simplest of ingredients and the simplest of recipes are often the best ones.

This was my first time using Helen's recipe, and I think it may just become my go to and favorite for the holidays.

Christmas Fruit Cake


Christmas Fruit Cake
Source: Helen Wright

200 gr flour
200 gr butter
200 gr sugar (I used half light brown sugar and half white)
4 eggs
800 gr fruit
half tbsp salt
4 tbsp spice and cinnamon
1/4 cup chopped cherries
1/2 cup chopped pecans
1/4 cup raisins
1 teaspoon vanilla extract


In a bowl, mix all the ingredients, until well incorporated.  I used my kitchenaid which made it easier to mix everything.

Line a cake pan.  The recipe didn't specify the size, but I used a round 8 inch pan for mine.  Make sure to line the bottom and sides of the pan.  Most fruit cakes require you to then wrap the pan in newspaper or brown paper and tie it, but this recipe didn't say to do that.

I was wondering if it would affect the bake, but it didn't and it baked up beautifully.

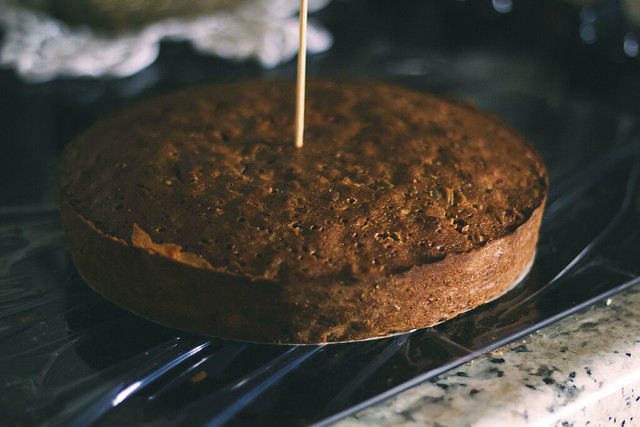
Bake in a preheated oven at 350 for one hour and a half to two hours.  The cake is ready when you insert a wooden skewer and it comes out completely dry.  Helen actually makes it a point to say that is what her grandmother used to say, so it needs to be absolutely dry which will help it keep for a long time once it's out of the oven.

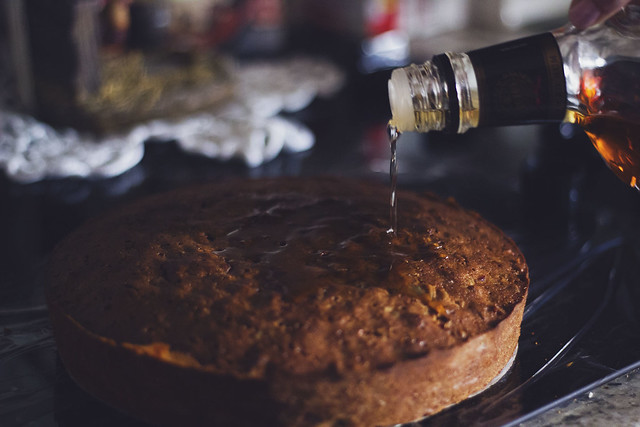
Once baked, removed from oven and allow to cool completely, then poke holes with a wooden skewer and pour over either whiskey, brandy or rum. 

Christmas Fruit Cake

I use rum in my cakes, that's our preference.  There really is no measurement but if you need to measure then I would say about 2 tablespoons or so.

Christmas Fruit Cake

Allow it soak in, then double wrap the cake in saran plastic wrap, then double layer of aluminum foil.  You can keep the cakes in a tupperware cake box, or as they are, but keep them out of sunlight and in a dark spot.  I keep my cakes in the pantry.

Every week, until Christmas, unwrap them and feed them again with more drink of your choice.  These cakes will keep for a really long time.

Enjoy :)

Friday, October 27, 2017

Vanilla Popcorn


Hey everyone, I know it's a been a while but I have a great recipe to share with you today.

As the year winds down and the holidays kick in, I find myself in the kitchen more.  Holiday baking is something I love doing and I tend to start pretty early, around the beginning of November, even though this year, I seem to have got right into it a little earlier than usual.

I've made one Christmas Fruit Cake already and will be making more this weekend.

But, when it comes to holiday baking, one of the things we most enjoy is snack foods, and I'm talking anything from chocolate peanut clusters to cookies and of course, popcorn.

Vanilla Popcorn is this year's choice, and if you've never made it before, you're going to want to try it.  I think it may even become one of your family's favorite.

Word of advice, make lots of it, because it goes fast.

Word of caution, it is not exactly healthy and it's extremely addictive, I could easily go through a whole batch on my own, so I have to control myself.

Anyway, enough talking let's make popcorn :)

Vanilla Popcorn

Vanilla Popcorn

12 cups popped popcorn (I used 1/2 cup of kernels)
1 cup sugar
1/4 cup white corn syrup
1/2 tsp salt
1 stick butter or margarine
1/2 tsp baking soda
1 tsp vanilla


In a pot add about 3 tablespoons of oil. Turn the heat on, and add 3 kernels of the popcorn to the pot. Once they pop, add the remaining kernels and cover. Shake gently over the heat as the rest of the popcorn pops, to prevent it from burning. Once the popping stops, remove from heat but keep the lid on for a few seconds more in case of any last minute kernels that may pop. Remove any unpopped kernels and pour into a big mixing bowl.

In a microwave safe bowl, add the sugar, corn syrup, salt, and butter, microwave for 30 seconds and give it a stir, then microwave for 2 minutes. Remove, stir again, and microwave for another 2 minutes. Once the time is up, carefully remove the bowl from the microwave (remember it's going to be super hot).

Add baking soda and vanilla and stir until it starts to foam. It will also thicken slightly. Pour over the popcorn and mix very well. Try to be quick because the caramel will start to harden.

Preheat the oven to 300 degrees, spread the popcorn on a cookie sheet, lined with parchment or foil. Bake for 20 to 30 minutes, making sure to stir every 10 minutes or so. Keep an eye on it though so you don't burn the sugar.

Remove from heat, let cool slightly and enjoy. It will be delicious and crunchy!!!

Friday, September 15, 2017

Chocolate Orange Drizzle Cake

In the world of cakes, I am one who prefers simplicity.

Maybe it's the fact that I grew up used to simple homemade vanilla cakes, those that my grandfather would throw together at midnight, just because the 4 grandchildren said they wanted cake.  He was awesome like that.

He never really measured, he never really used a recipe, he actually didn't cook much but we all knew him for his perfect cakes.  There were no rich sweet gloopy frostings slathered on top, or complicated fillings.  They were homemade, plain, not too sweet, with a dusting of powdered sugar, and enjoyed over a cup of tea.


Those memories have stuck with me my whole life.

I'm not a huge cake fan, I've always been more into savory than sweets, and I really dislike very rich cakes especially with tons of frosting.  They make me feel quite sick, to be honest.  But once in a while I'll get a hankering for a slice of fluffy cake and I have to cave.

And here we are.....

Chocolate Orange Drizzle Cake

If you like chocolate oranges, you are in for a treat, because this cake tastes just like one of those. My son loves the chocolate oranges and he was quite excited when I handed him a slice of this cake after photographing for the blog.

The recipe comes from one of my very much loved British cookbooks that I've had for many years.

Chocolate Orange Drizzle Cake

Chocolate Orange Drizzle Cake


For the cake
1 ½ sticks of butter, softened
¾ cup sugar
3 large eggs
Grated rind of 2 oranges
1 ¾ cups self rising flour, sifted
2 tbsp milk

For the topping
Juice of 2 oranges
½ cup sugar
2 oz. semisweet chocolate

Preheat the oven to 350° F.  Grease and line a 7 in. round pan.  Cream together the butter and sugar until light and fluffy.  Add the eggs, one at a time, and beat well.  Add the grated orange rind, flour and milk and fold in with a metal spoon.

Turn into the prepared pan, smooth the top and bake for 30-40 minutes until a skewer comes out clean.  Remove from the oven and leave to cool in the pan.

When cool, score the top of the cake lightly with a sharp knife.  Put the orange juice and granulated sugar into a pan and heat gently until the sugar has dissolved.

Bring to the boil and boil for 1-2 minutes.  Pour over the cake.

When all the juice has soaked in, carefully remove the cake from the pan.  Melt the chocolate and drizzle over the top.

Chocolate Orange Drizzle Cake

You can leave it as is, or do a dusting of powdered sugar like I did.

Chocolate Orange Drizzle Cake

Monday, September 04, 2017

Fried Okra

Crunchy, golden brown, delicious Okra.

There really is much you can say about this yummy side dish, or appetizer, whatever you wish.

Again, I had no clue what Okra was until I moved to the States, it's not a vegetable that is available in South Africa or Portugal, but boy is it one of my favorite things ever.

Okra is a pretty sticky vegetable to work with which actually makes it quite easy to coat.  You will find a lot of variations and recipes for making the fried okra.  Family recipes, favorite recipes all using either flour, or breadcrumbs or panko crumbs, some using just cornmeal, but I like to use a mixture of both flour and cornmeal.


Fried Okra

2 lbs Okra, cut into 1/2 inch pieces
Buttermilk
Garlic powder
1/2 tsp ground black pepper
3 tbsp all purpose flour
1/2 cup cornmeal
Vegetable oil to fry

Drizzle some buttermilk over the okra, just enough to coat it well. Sprinkle on the flour and mix well to ensure that it's all coated. Sprinkle on the cornmeal and once again give it a good stir until all the okra is coated and doesn't stick together.

Fry until golden brown, remove onto paper towels to absorb excess oil. Serve.


Fried Green Tomatoes

I used to loathe tomatoes, like really loathe them.  Growing up, the worst thing you could do was give me tomato in any way, shape or form, it would actually make me gag.  I never quite understood why, but as I grew older I started liking them and now I absolutely love tomatoes.

When I moved to the States 19 years ago, it was the first time I had ever heard of green tomatoes, and especially fried green tomatoes.  Everyone raved about them, especially in the South but I wasn't quite sure that it was something I would enjoy, I mean I had started liking tomatoes but the thought of them fried wasn't exactly appealing to me.

Fast forward to about a year ago when I finally tried them and fell in love, they're now one of my favorite appetizers to get when we eat out.

A few weeks ago, the hubby and I went to the Farmer's Market and I bought beautiful green tomatoes and knew exactly what I would be making with them.
 

Fried Green Tomatoes
Source:  Divas can Cook

2 medium-sized green tomatoes
1 teaspoon salt
½ teaspoon sugar
¼ teaspoon black pepper
¼ teaspoon dried basil
1 cup all-purpose flour (I added some garlic powder to mine)
1 cup buttermilk
1 egg
1 cup seasoned bread crumbs
1¼ cup yellow cornmeal


Slice tomatoes into ¼- 1/2 inch slices.  Place tomatoes on several layers of paper towels.
Mix together salt, sugar, black pepper and basil in a small bowl.

_MG_8883

Sprinkle tomatoes generously with spice mixture ( may not need all of it) and let sit for about 10-15 minutes to allow the extra tomato juices to drain out.

Meanwhile, prepare your dipping station! In one bowl, add the flour.  In another bowl mix together the buttermilk and egg.  In the last bowl, mix together the bread crumbs and yellow cornmeal.

Start by dipping the tomatoes slices into the flour on both sides and shaking off the excess flour. (be sure to get the sides as well)
Lay the slices into the egg mixture until both sides are coated with the mixture and flour no longer shows.

Place the tomato slices into the breadcrumb mixture and press to coat both sides evenly.  Let tomatoes sit for about 5 minutes to allow the coating to set.

Heat oil in a skillet until hot. (Do a test with a bread crumb first to make sure the oil is at the right temperature. The breadcrumb should begin to fry evenly immediately when placed in the oil.)
Place tomatoes into the skillet, without crowding the pan.  Fry each side for about 4-5 minutes until golden brown.

Place on a cooling rack with paper towels below to absorb the excess oil that drips off.  Serve hot.