Monday, December 17, 2012

Cinnamon Roll Pancakes

I've had these babies in sight for a long long time.

It was one of those recipes that I ran across a while back and then kept putting it off to try, well, today was the day. And now I regret not trying them months back because I've been missing out on some yumminess.

Careful though, can't enjoy these every morning, but for a holiday or a special occasion they are perfect.

Recipe comes from Recipe Girl and she has some other variations to try, like the Pumpkin Cinnamon Roll and even Gingerbread Roll Pancakes. You bet I'll be trying those soon.

On to the recipe........


Cinnamon Roll Pancakes

Cinnamon Roll Pancakes

CINNAMON FILLING:
4 tablespoons (1/2 stick) unsalted butter, just melted (not boiling)
1/4 cup + 2 tablespoons packed light brown sugar
1/2 tablespoon ground cinnamon

CREAM CHEESE GLAZE:
4 tablespoons (1/2 stick) unsalted butter
2-ounces cream cheese, at room temperature
3/4 cup powdered sugar
1/2 teaspoon vanilla extract

PANCAKES:
1 cup all-purpose flour
2 teaspoons baking powder
1/2 teaspoon salt
1 cup milk
1 large egg, lightly beaten
1 tablespoon canola or vegetable oil


Prepare the cinnamon filling: In a medium bowl, stir together the butter, brown sugar and cinnamon. Scoop the filling into a quart-sized heavy zip baggie and set it aside (see *Tips below).

Prepare the glaze: In a small pan, heat the butter over low heat until melted. Turn off the heat and whisk in the cream cheese until it is almost smooth. Sift the powdered sugar into the pan, stir and add in vanilla extract. Set the pan aside while you make the pancakes.

Prepare the pancake batter: In a medium bowl, whisk together the flour, baking powder and salt. Whisk in the milk, egg and oil, just until the batter is moistened (a few small lumps are fine).

Cook the pancakes: Heat a large, nonstick skillet over medium-heat and spray with nonstick spray. Use an ice cream scoop (or 1/3 cup measuring cup) to add the batter to the pan. Use the bottom of the scoop or cup to spread the batter into a circle (about 4-inches in diameter). Reduce the heat to medium low. Snip the corner of your baggie of cinnamon filling and squeeze the filling into the open corner. When your pancake begins to form bubbles, add the filling. Starting at the center of the pancake, squeeze the filling on top of the pancake batter in a swirl (just as you see in a regular cinnamon roll).

Cinnamon Roll Pancakes

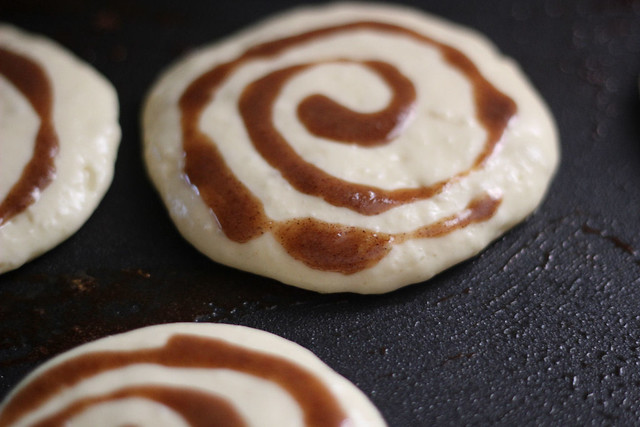
Cook the pancake 2 to 3 minutes, or until the bubbles begin popping on top of the pancake and it's golden brown on the bottom. Slide a thin, wide metal spatula underneath the pancake and gently but quickly flip it over. Cook an additional 2 to 3 minutes, until the other side is golden as well. When you flip the pancake onto a plate, you will see that the cinnamon filling has created a crater-swirl of cinnamon. Wipe out the pan with a paper towel, and repeat with the remaining pancake batter and cinnamon filling. Re-warm the glaze briefly, if needed. Serve pancakes topped with a drizzle of glaze.

Cinnamon Roll Pancakes


*Quick and easy tip: Use a boxed pancake mix as the base for this recipe.
*Tips for the cinnamon filling: Before swirling, open up the baggie again and give it a good stir to re-incorporate any butter that may have separated from the sugar. You want the mixture to thicken a bit- it's best when it's similar to the squeezing texture of a tube of toothpaste, which will happen if you leave it at room temperature for several minutes. Don't try to use the filling for the pancake swirl unless it has thickened as it will be too runny to make a solid swirl.

*Keep the heat low or your pancakes might cook up too quickly. Don't flip them until you see those bubbles starting to pop on top. Flip them with a wide spatula so you can grasp the whole thing without batter and filling dripping all over the place!

Wednesday, December 12, 2012

Homemade Fettuccine Noodles

So a few days ago my husband gave me one of my Christmas presents early.  He just couldn't hold it in anymore because he knew that it was something I had been wanting for a while.

December 12

I had NO clue what it was, even though he kept throwing hints around.  When I opened it up, I was pretty ecstatic.

See, I've been wanting a pasta maker for years, just never got around to buying one.

December 12

In my journey to make as much homemade as I can, making pasta was one thing and now I have the perfect excuse to get right on it.

The recipe I used for this batch came from the book that came with the Pasta Maker.

Very simple recipe and makes quite a big batch of noodles. This is the basic pasta recipe which can also be used to make spaghetti, angel hair and lasagna noodles.

Homemade Fettucine Noodles

PASTA
Mamma Antonietta

4 eggs, at room temperature
3 cups unbleached all-purpose flour
½ cup tepid water or as needed


1. Place flour on a wood board, make a well, and break the eggs into it.
2. If you prefer, you can mix it in a bowl with a fork, or in an electric mixer with a
dough hook.
3. Slowly incorporate the flour into the eggs.
4. It will come together in a smooth, elastic (manageable) ball, with just enough
moisture that it sticks together, but does not stick to the table or bowl.
5. You may need to add a bit of water if the dough is too dry and crumbly, or a bit more
flour if too wet and sticky.
6. Let the dough rest for about 30 minutes covered with a towel. (If in a hurry, you can
skip the resting period.)
7. Use a sharp knife to cut off a chunk from the ball, and roll it to about ⅛” (2.5 mm)
thick. This should be about the thickest setting on your pasta machine.
8. Sprinkle some flour in the middle of the flattened sheet, fold it double, and roll it flat
again.
9. Repeat at least a half dozen times, until the sheet has taken shape.

December 12

10. The dough should be relatively soft, however anytime it seems too moist, sprinkle a
little flour.
11. Finally, roll it to the desired thickness for cutting.
12. After cutting, sprinkle liberally with flour, to keep it from sticking in bunches until
you get it into the pot of salted boiling water.
13. Pasta strands can be hung from a drying rack, to keep from sticking until they’re
ready for the pot, or to dry for freezing.

December 12

Monday, December 10, 2012

Crockpot Spinach Alfredo Lasagna

Oooohhhh Lasagna.  Love love love it.

I've been really enjoying using my Taste of Home Slow Cooker recipe book.  Have found so many that I want to try.

Spinach Alfredo Lasagna

I marked this one off last month and then didn't get around to making it, but today was the day.  Everyone is sick and miserable and now it's coming my way, so it was the perfect meal to throw in the crockpot and forget about until dinner time.

It's delicious.

If you think you can't make Lasagna in the crockpot, you are going to be majorly surprised, give it a try :)

Spinach Alfredo Lasagna

Spinach Alfredo Lasagna


1 pound ground beef
1 medium onion, chopped
2 garlic cloves, minced
1 jar (24 ounces) spaghetti sauce
1 package (8 ounces) no-cook lasagna noodles
1 carton (15 ounces) ricotta cheese
1/2 cup grated Parmesan cheese
2 tablespoons minced fresh parsley
1/2 teaspoon pepper
8 cups (32 ounces) shredded part-skim mozzarella cheese
1 package (10 ounces) frozen chopped spinach, thawed and squeezed dry
1 jar (15 ounces) Alfredo sauce


In a large skillet, cook the beef, onion and garlic over medium heat until meat is no longer pink; drain. Stir in spaghetti sauce.

Spread 1 cup meat mixture in an ungreased 5- or 6-qt. slow cooker. Arrange four noodles over sauce, breaking noodles to fit if necessary. In a small bowl, combine the ricotta cheese, Parmesan cheese, parsley and pepper; spread half over noodles. Layer with 2 cups mozzarella cheese and 1 cup meat mixture.

Top with four noodles, spinach, Alfredo sauce, 2 cups mozzarella cheese, four noodles and remaining ricotta mixture. Layer with 2 cups mozzarella cheese, 1 cup meat mixture and any remaining noodles, meat mixture and mozzarella cheese.

Cover and cook on low for 4-5 hours or until noodles are tender.

Yield: 8 servings.

Spinach Alfredo Lasagna

Sunday, December 09, 2012

Kung Pao Chicken

I think it's the one item I most request at Chinese places.  Love the chicken, spicy, peanut combo.

Making it at home is very easy and tastes just as good.  Only thing I changed is that I didn't add the red peppers because my youngest can't stand them.  But aside from that, Yum!

Kung Pao Chicken

Kung Pao Chicken
Credit:  Taste of Home

8 whole chicken wings (about 1-1/2 pounds) *I used boneless thighs*
2 tablespoons sugar
2 teaspoons cornstarch
1/4 cup water
1/4 cup soy sauce
2 tablespoons lemon juice
1/4 teaspoon crushed red pepper flakes
1 tablespoon canola oil
1 small sweet red pepper, diced
1/2 cup diced onion
1 to 2 garlic cloves, minced
1/3 cup peanuts
Hot cooked rice


Cut chicken wings into three sections; discard wing tip section. Set the wings aside. In a small bowl, combine the sugar, cornstarch, water, soy sauce, lemon juice and pepper flakes until blended; set aside.

In a large skillet over medium-high heat, heat oil. Cook chicken wings, uncovered, for 10-15 minutes or until chicken juices run clear, turning occasionally.

Add red pepper and onion; cook, uncovered, for 3-5 minutes or until vegetables are crisp-tender. Add garlic; cook 1 minute longer. Stir cornstarch mixture; gradually add to skillet. Bring to a boil; cook and stir for 2 minutes or until sauce is thickened and vegetables are tender. Sprinkle with peanuts. Serve with rice.

Yield: 4 servings.

Kung Pao Chicken

Monday, December 03, 2012

Pumpkin Chocolate Loaf

Pumpkin Chocolate Loaf

I've been baking up a storm lately, getting things ready to ship off for Christmas Gifts.

These mini loaves were a part of the homemade goodies and I just love the pumpkin and chocolate mix.

Another great recipe from Taste of Home.


Pumpkin Chocolate Loaf

Pumpkin Chocolate Loaf


3-3/4 cups all-purpose flour
3-1/2 cups sugar
1-1/2 teaspoons salt
1-1/2 teaspoons baking powder
1-1/4 teaspoons baking soda
1-1/4 teaspoons ground cinnamon
1 to 1-1/4 teaspoons ground cloves
1/2 teaspoon ground nutmeg
3 eggs
1 can (29 ounces) solid-pack pumpkin
1-1/4 cups canola oil
3 ounces unsweetened chocolate, melted and cooled
1-1/2 teaspoons vanilla extract
2 cups (12 ounces) semisweet chocolate chips

Directions

In a large bowl, combine the flour, sugar, salt, baking powder, baking soda, cinnamon, cloves and nutmeg.

Pumpkin Chocolate Loaf

In another large bowl, whisk the eggs, pumpkin, oil, chocolate and vanilla.

Stir into dry ingredients just until moistened. Fold in chips.

Transfer to three greased 9-in. x 5-in. loaf pans.

Pumpkin Chocolate Loaf

Bake at 350° for 55-65 minutes or until a toothpick inserted near the center comes out clean. Cool for 10 minutes before removing from pans to wire racks. Wrap and freeze for up to 6 months.

Yield: 3 loaves.

Note: I use the mini loaf pans and get 5 loaves out of this recipe.

Pizza in a Pot

Oh my, I do love a good slow cooked meal, especially in the winter time.

I don't get to use mine as often as I would like, and nowhere near as much as I used to back in Idaho where it actually got cold and snowy and my crockpot beckoned for soups and stews..

Pizza in a Pot

I have a few recipes on the menu for my crockpot....and one especially because I have the best review/giveaway coming up which focuses ALL on slow cooking etc. Stay tuned for that.

Anyway, on to the recipe. I love Taste of Home and have a bunch of cookbooks, magazines etc.....this recipe comes from one of the Slow Cooker Cookbooks and is a winner in my pasta and pizza loving household.

Pizza in a Pot

Pizza in a Pot

1-1/2 pounds ground beef
1 medium green pepper, chopped
1 medium onion, chopped
1 can (15 ounces) tomato sauce
1 jar (14 ounces) pizza sauce
2 tablespoons tomato paste
3 cups spiral pasta, cooked and drained
2 packages (3-1/2 ounces each) sliced pepperoni
2 cups (8 ounces) shredded part-skim mozzarella cheese

Directions

In a large skillet, cook the beef, green pepper and onion over medium
heat until meat is no longer pink; drain. Stir in the tomato sauce,
pizza sauce and tomato paste.

In a 5-qt. slow cooker, layer the pasta, beef mixture, pepperoni and
cheese. Cover and cook on low for 3-4 hours or until heated through.

Yield: 8 servings.

If you'd like, substitute 1/2 pound bulk Italian sausage for the pepperoni in Pizza in a Pot. Cook it along with the ground beef, green pepper and onion.

Sunday, December 02, 2012

Zuppa Toscana

By far, my favorite dish from Olive Garden is their Zuppa Toscana, along with those delicious breadsticks.  Yum!

But honestly, I don't always get to Olive Garden, nor do I have the money to go by anytime I crave this soup.  So, I went searching online because as you know, many of the restaurants have copycat recipes out there, and I do have quite a stash of bookmarked favorites to try.

I've been making this soup for a while now, but hadn't had it in a few months, probably a year or so.

Since I picked up some great looking Kale at the grocery store yesterday, it was the perfect time to make another batch.  This recipe comes from Tuscan Recipes.

Zuppa Toscana

Olive Garden's Zuppa Toscana
Makes 6 to 8 servings

1 lb ground Italian sausage
1½ tsp crushed red peppers
1 large diced white onion
4 Tbsp bacon pieces
2 tsp garlic puree
10 cups water
5 cubes of chicken bouillon
1 cup heavy cream
1 lb sliced Russet potatoes, or about 3 large potatoes
¼ of a bunch of kale

Sauté Italian sausage and crushed red pepper in a large pot. Drain excess fat, refrigerate while you prepare other ingredients.

In the same pan, sauté bacon, onions and garlic over low-medium heat for approximately 15 mins. or until the onions are soft.

Add chicken bouillon and water to the pot and heat until it starts to boil.

Zuppa Toscana

Add the sliced potatoes and cook until soft, about half an hour.

Zuppa Toscana

Add the heavy cream and just cook until thoroughly heated.

Zuppa Toscana

Stir in the sausage and the kale, let all heat through and serve.


Note: This recipe makes enough for our family of four, and I still have 2 mason jars with leftover soup for midweek lunches :)

Monday, November 26, 2012

Red Pepper Meatballs with Cream and Pepperjack Cheese

Another recipe just born out of mid air.

It's been such a busy day for me, as it usually is when my husband has college classes right after work.  It means that dinner has to be on the table at 4pm and with housework, two kids, homeschooling and everything else going on, sometimes there just isn't enough time for everything.

Even though I am so strict about following a menu plan, there are still days that things don't quite work out like I planned, so I ended up with a pound of ground beef and not a clue on what to make.

A little of this, a dash of that, and into the oven it went.  This is what became of the ground beef, and the family approved it with big thumbs up :)

Red pepper meatballs

Red Pepper Meatballs with Cream and Pepperjack cheese

1 pound ground beef
salt and pepper to taste
1 garlic clove, finely diced
Massa de pimentao (roasted red pepper paste)
Heavy cream
Pepperjack cheese slices

Mix the ground beef, salt and pepper, garlic and about a tablespoon and a half of the red pepper paste.

Shape into meatballs and place in a casserole dish. 

Red pepper meatballs

Pour in heavy cream ( just eyeball it, I would say about a cup or so), and add some pepperjack cheese slices over the top.  Cover with foil and bake at 400 degrees for about 30 minutes or until meatballs are cooked through and juices run clear.  You can cut one open if need be, to make sure.

Serve immediately.

Red pepper meatballs

Christmas Fruit Cake

About a week or two ago, I mentioned on Facebook that I really was craving fruit cake, and I was flooded with wonderful recipes from my friends.

I decided to try one right away, and the recipe I picked came from my sweet friend Lindsay at Rocking Chair Reflections. She actually gave me two recipes, and I've made both since then, so I'll share them here for you and if you're going to make one, you can pick whichever appeals to you the most.

November

Fruit Cake #1

1 and a half pounds of mixed fruit (raisins, sultanas, currants etc)
I lb dates (chopped and stoned)
half lb cherries
half lb walnuts
half lb butter (I use marge)
1 cup sugar
2 cups water
2 heaped cups flour -plain
4 eggs
1 teasp bicarb (baking soda)
2 teasp mixed spice
half teasp ground ginger
quarter teasp cinnamon
quarter teasp nutmeg
quarter teasp cloves (ground)

Cook all the fruit except the cherries and nuts with butter and sugar and 1 cup of water for 5 minutes. In very large pot (I mix the whole cake in this pot)
Allow to cool.
Add cherries and nuts.
Dissolve bicarb in one cup water.
Sift all dry ingredients.
Add eggs to mix, then bicarb, then dry ingredients.
Mix well and pour into greased lined pan.
I roll up newspaper and tie it around the outside of the cake tin as well.
Bake at 180C (350F) for half an hour, then drop the temp to 160C (320F) for about 2 and a half hours.

Once the cake is out of the oven, and still warm, poke holes in the top of it with a skewer, and drizzle/pour brandy over it to soak in. You can do this every now and then from now till Christmas.


Fruit Cake

Fruit Cake #2

Double this recipe at Christmas.

1lb mixed fruit
1 cup water
1 cup sugar
quarter lb marge
1 teaspoon bicarb (baking soda)
1 teasp mixed spice
dash cinnamon

Mix all the above in a large pot and boil for 10 mins

Add 2 cups flour - plain
2 teaspoons baking powder
2 beaten eggs
cherries
2 pieces of chopped glace pineapple
2 pieces of chopped glace fig
chopped walnuts.

Greased, lined pan + newspaper and string around.
Bake at 180 (350F) for quarter of an hour and then 160C (320F) for 1 and a quarter hours.

Wednesday, November 21, 2012

Pumpkin Pie Sheet Cake

Pumpkin Pie.

Love it, and love the traditional pie but there are years when you have more people at the Thanksgiving table and it's imperative that everyone get pie.  Right???

Pumpkin Pie Sheet Cake

It's easier to whip up a big pan instead of a gazillion pies.

Now seeing that it's usually just me, the hubby and our two kids for Thanksgiving, I still prefer to make a big pan because we love having leftovers for a few days and nothing hits the spot late at night, like a slice of pie with some whipped cream on top.  YUM!

This recipe comes from Jamie Cooks it Up and it's a great way to feed a crowd.  The pan I used was my large Pampered Chef Cookie Sheet which is huge, like 15 x 10 x 1 inch I think.  Still, it bakes nice and tall and it's wonderful.

Pumpkin Pie Sheet Cake

Pumpkin Pie Sheet Cake

Crust:
1 yellow cake mix
1/2 C butter, melted
1 egg

Filling:
1 29 ounce can pumpkin
1 1/2 C sugar
1 t salt
2 t cinnamon
1 t ginger
1/2 t cloves
4 eggs
2 12 ounce cans evaporated milk

1. To make the crust, pour the cake mix into your stand mixer, or medium sized mixing bowl. Pour the melted butter over the cake mix and stir it in for about 30 seconds. Add your egg and mix until all ingredients are well combined.

2. Spray a large jello roll pan with cooking spray. Press the crust into the pan.

Pumpkin Pie Sheet Cake

3. Into a small mixing bowl combine the sugar, salt, cinnamon, ginger and cloves.

Pumpkin Pie Sheet Cake

4. Crack the eggs into your stand mixer and beat them for about 1 minute, or until frothy.

5. Add the sugar mixture and the pumpkin and mix until combined.

6. Pour in the canned milk and mix until combined.

7. CAREFULLY pour the filling over the crust. Now. Just a word to the wise here. Your pan will be full. Really full. The kind of full that just might spill over the top while you carry it to the oven, if you aren't careful. I would advise setting the crust as close to the oven as possible, then pour the filling in so you don't have very far to walk.

8. Bake at 350 degrees for 1 hour, or until a knife inserted into the middle comes out clean.

9. Cool completely, then cut into squares and serve with whip cream.

Thursday, November 15, 2012

Cheese Enchiladas

You know what I like the most about enchiladas???

The fact that the filling can really be left up to your imagination, it can have meat, it can have chicken, it can have just cheese, it can have whatever your heart desires.

These are extremely simple enchiladas and I guess you could think of them as being simple as can be, but don't be fooled by the simplicity because they really are delicious.

The recipe is for 16 enchiladas, if you think that is too much for your family, just remember you can always freeze them for another meal :)

Cheese Enchiladas

Cheese Enchiladas
Credit: Taste of Home

Ingredients

2 cans (15 ounces each) tomato sauce
1-1/3 cups water
2 tablespoons chili powder
2 garlic cloves, minced
1 teaspoon dried oregano
1/2 teaspoon ground cumin
16 flour tortillas (8 inches), warmed
4 cups (16 ounces) shredded Monterey Jack cheese
2-1/2 cups (10 ounces) shredded cheddar cheese, divided
2 medium onions, finely chopped
1 cup (8 ounces) Daisy Brand Sour Cream
1/4 cup minced fresh parsley
1/2 teaspoon salt
1/2 teaspoon pepper
Shredded lettuce, sliced ripe olives and additional Daisy Brand Sour Cream, optional


Directions

In a large saucepan, combine the first six ingredients. Bring to a boil. Reduce heat; simmer, uncovered, for 4-5 minutes or until thickened, stirring occasionally. Spoon 2 tablespoons sauce over
each tortilla.

In a large bowl, combine the Monterey Jack, 2 cups cheddar cheese, onions, sour cream, parsley, salt and pepper. Place about 1/3 cup down the center of each tortilla.

Cheese Enchiladas

Roll up and place seam side down in two greased 13-in. x 9-in. baking dishes. Pour remaining sauce over top.

Cheese Enchiladas

Bake, uncovered, at 350° for 20 minutes. Sprinkle with remaining cheddar cheese. Bake 4-5 minutes longer or until cheese is melted.

Yield: 16 enchiladas.

Cheese Enchiladas

Lucky Leaf Winner

Congratulations to Ally Jo from Sweet Woodruffs :)
I'll be contacting you shortly!   Thank you to all who entered and keep an eye out, I have a few more great giveaways coming up like a KitchenAid Slow Cooker  :)

Friday, November 09, 2012

Cherry Kuchen PLUS a Lucky Leaf Giveaway

Lucky Leaf

It's no secret I love Lucky Leaf and have always enjoyed working with them in promoting their amazing pie fillings.

I use them year long, but I must admit that during the holidays, even more so.  My pantry is constantly stocked with Lucky Leaf Cans of all different kinds, apple and blueberry, strawberry and cherry and peach.  So many wonderful flavors, so many different ways to enjoy them.

Lucky Leaf

Last week I received the cutest package in the mail from Lucky Leaf.  It included the pie fillings I love but it also came with the most gorgeous Hot Dish carrier, soooooo pretty.

Lucky Leaf

Good Things Come to Those Who Bake!

That is  Lucky Leaf's theme for this years holiday baking, and I for one couldn't think of a cuter title.

Now on to the recipe, I received 3 in the mail. Cherry Kuchen, Amaretto Peach Cobbler and Blueberry Pecan Crisp. My daughter asked for the Cherry Kuchen because she loves cherries, so that is the one I picked to showcase today.

November

Cherry Kuchen

Ingredients
1 can (21 oz.) LUCKY LEAF Cherry Pie Filling
1/4 c. butter or margarine
1/2 c. sugar
1 egg
1-1/2 c. sifted flour
2-1/2 tsp. baking powder
1/2 c. milk
1 tsp. vanilla

Preparation
Sift dry ingredients. Cut in butter. Combine egg, milk and vanilla. Add to flour mixture.

Lucky Leaf

Pour pie filling into greased 7" x 11" glass baking dish (2 quart).

Lucky Leaf

Cover with batter. Sprinkle with sugar and cinnamon. Bake at 350 degrees for 25 minutes.


Servings: 8 

Lucky Leaf

My daughter LOVED it. I haven't been able to try it yet as I have been sick with a stomach bug, but trust me, I WILL be very soon because it smells fantastic and even though I'm not a cherry fan, this one is calling my name.

Go on over to the Lucky Leaf website and check out their products.  You can also find them on Facebook, Pinterest and Twitter.

And now for the best part.  One of my lucky readers will receive a package courtesy of Lucky Leaf to get them baking in the kitchen this holiday season.

In prize will include a can of Lucky Leaf Pie Filling, a seasonal kitchen towel and recipe card.

And what do you have to do to enter?????  Nothing much, I won't be sending you on a treasure hunt anywhere.

A comment left right here on the blog will suffice. :)

Giveaway is open to all US residents.  It will run until next week Wednesday, the 14th.

Good Luck!


I was provided with a Lucky Leaf tasting kit to review.  Opinions and thoughts expressed are mine alone.

Thursday, November 08, 2012

Impossibly Easy Bacon Pie

Impossibly Easy Bacon Pie

Bacon!

That's all. That's pretty much the only word that I need to hear and it sways me immediately in that direction. I mean, could you go wrong with bacon, ever?????

So I'm not going to say much on this, other than it's bacon, and it's bisquick, and it's easy and it's yummy. Ok maybe I've said more than I planned to, but you get the picture right?


Impossibly Easy Bacon Pie

Impossibly Easy Bacon Pie
Credit: Bisquick


12 slices bacon, crisply cooked, crumbled
1 cup shredded Swiss cheese (4 oz)
1/3 cup chopped onion (you can substitute with green onion too)
1/2 cup Bisquick
1 cup milk
1/8 teaspoon pepper
2 eggs


Preheat oven to 400 degrees. Grease pie plate, 9x1/1/4 inches.

Sprinkle bacon, cheese, and onion in pie plate.

Stir remaining ingredients until blended. Pour into pie plate.
Bake 35- 40 minutes or until knife inserted in the center comes out clean. Let stand 5 minutes before serving.

Impossibly Easy Bacon Pie

The recipe says it serves 6, but honestly I think it is maybe a 4 serving recipe. If you serve it with a salad or another side dish, then yes, but if you're going to serve it as the main dish, you'll need to double it.

Friday, November 02, 2012

Homemade Crockpot Applesauce

Homemade Crockpot Applesauce

I think if there's one fruit that screams Fall, it's apples.

I usually buy them in excess and use them in a myriad of recipes, freeze some for later use, or make big batches of applesauce to can.

Homemade Crockpot Applesauce

My youngest can't stand applesauce or anything apple, for that matter. I think it's a texture thing with him.

My daughter on the other hand, loves applesauce, so this is a special treat for her.

When I went grocery shopping yesterday, they were having a huge sale and the apples were super cheap, so I bought a ton for us to enjoy, some to freeze and threw some in the crockpot for this applesauce.

This is how I always make mine, it's so easy you'll quickly remember it....and I don't think you'll be buying store bought again :)

Homemade Crockpot Applesauce

Homemade Crockpot Applesauce

5 big apples or 10 small ones (I like using Honeycrisp)
1/2 cup of water
1/2 cup of sugar
cinnamon


Peel, core and cut the apples into small chunks, drop them in the crockpot. Add the water and the sugar. You don't have to add the cinnamon but we love it, so I sprinkle a good amount on top, just according to taste.

Cook on HIGH for 4 hours or until the apples are mushy.

You can leave them chunky if you like your applesauce that way, but we like ours pureed, so I just use my immersion blender and puree them right in the crockpot.

Pour into jars and either process them for canning, or if you're eating them right away, let the applesauce cool down and then place in the refrigerator.

We also like eating the applesauce warm.

Enjoy!

Homemade Crockpot Applesauce