Monday, June 27, 2011

Crispy Southwestern Wontons

Another great recipe from Kevin and Amanda's.


Crispy Southwestern Wontons

Crispy Southwestern Wontons

1 tbsp olive oil
1/4 cup diced onion
1/4 cup diced red bell pepper
1 clove garlic, minced
1/4 cup frozen corn kernals
1/4 cup canned black beans, drained
5 oz (1 cup) chicken, shredded
1/4 tsp pepper
1/2 cup shredded cheddar cheese
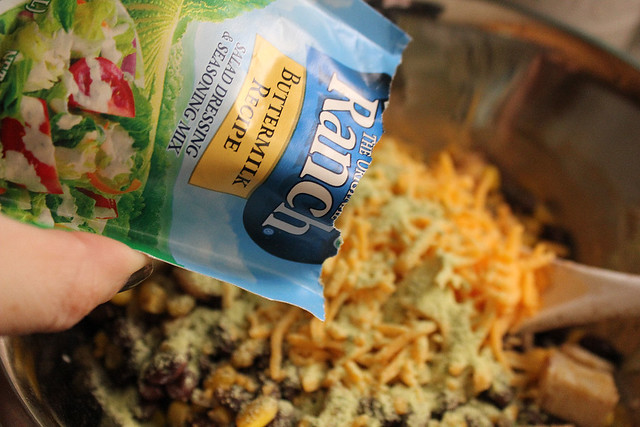
2 tbsp (1/2 pkg) dry ranch dressing
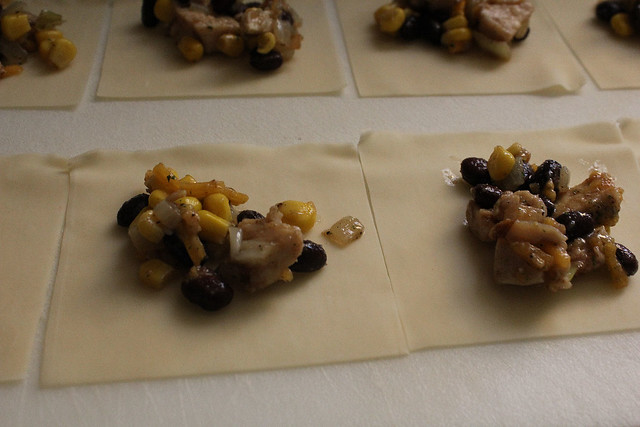
24 wonton wrappers
canola or vegetable oil for frying


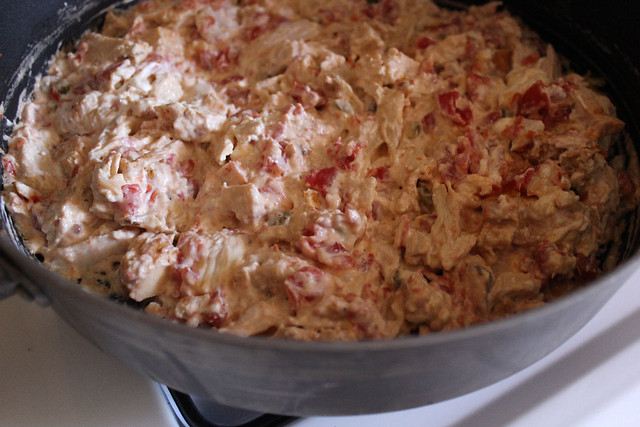
Heat olive oil in a large skillet over medium heat. Add onions and salt and saute for 5 minutes. Add bell pepper and cook for 5 more minutes. Add garlic and stir for 1 minute. Add corn, beans, and chicken and stir to combine.

Crispy Southwestern Wontons

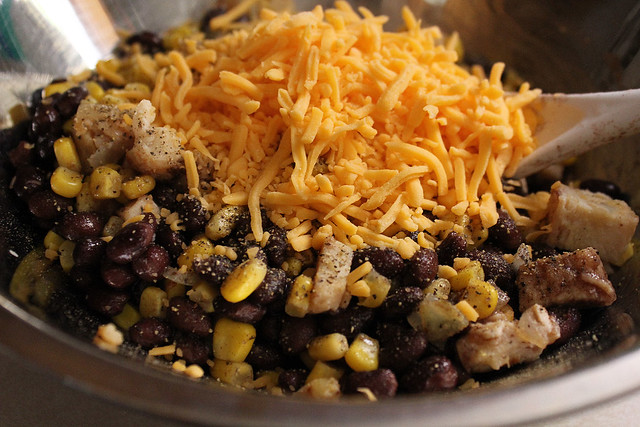
Move the chicken mixture to a bowl and season with pepper, then stir in cheese and dry ranch dressing.

Crispy Southwestern Wontons

Crispy Southwestern Wontons

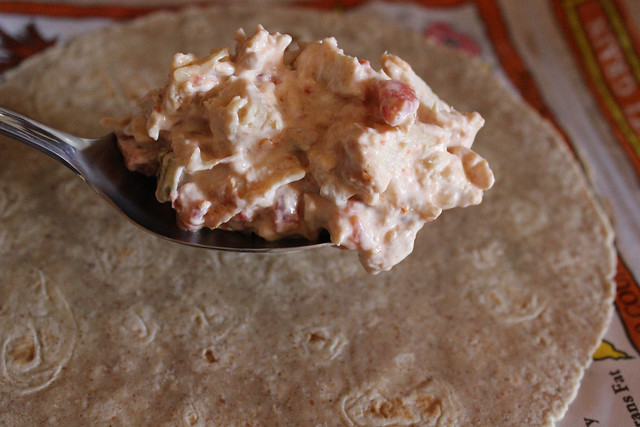
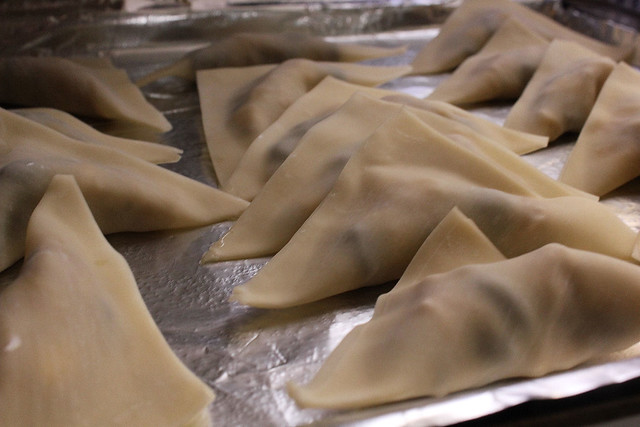
Begin heating about 1/2 inch of canola or vegetable oil in a large skillet over medium heat. Meanwhile, scoop 1 teaspoon of chicken mixture into the center of each wonton wrapper.

Crispy Southwestern Wontons

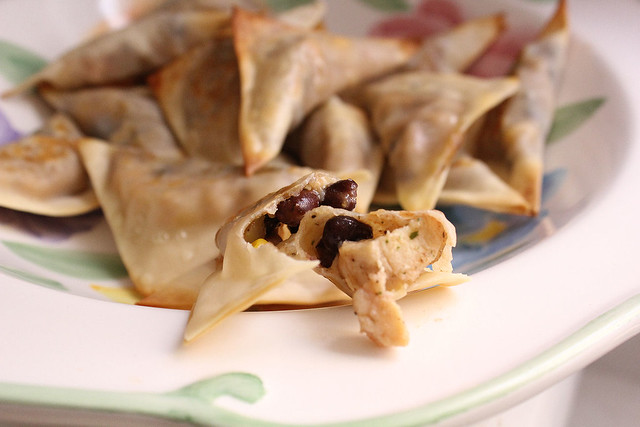
Rub some water on two sides of the wrapper, then fold over to firmly seal, forming a triangle, and gently press out any extra air pockets. When the oil is hot, place 6 wontons at a time into oil. Cook about 1 minute per side until golden and crispy.

Makes 24 wontons

Crispy Southwestern Wontons

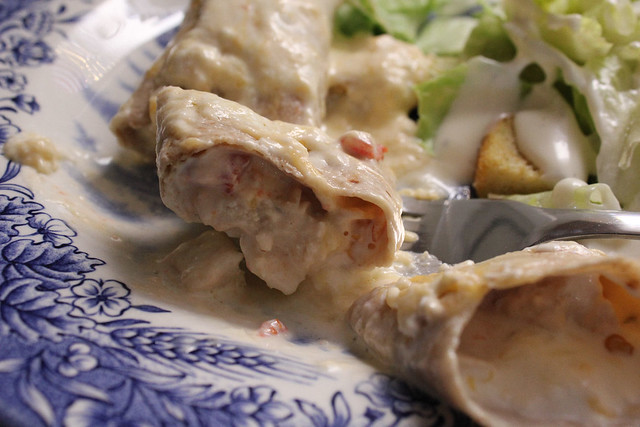
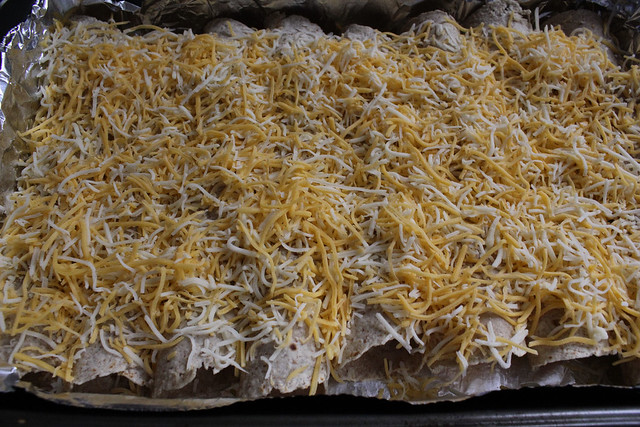
Since hubby and I are still watching our diet, I didn't fry them, I baked them in a 375 degree oven for about 10 minutes on each side :)

Crispy Southwestern Wontons

Sunday, June 26, 2011

Zucchini and Bacon 3 Cheese Lasagna

Mmmmm Lasagna.  I don't care how many gazillion versions of this recipe there are, I vow to try them all, or at least as many as I can get my hands on.

Zucchini & Bacon 3 Cheese Lasagna

When I saw this one over at Kevin and Amanda's, I literally drooled on the keyboard, I mean....Zucchini AND Bacon?  Are you kidding me?  That's like heaven on a plate right there.

I'm not going to talk much about this one, I think it's best left to the taste buds to speak for themselves, so here, thanks again to Kevin and Amanda, love that blog.

Zucchini & Bacon 3 Cheese Lasagna

Zucchini and Bacon Three Cheese Lasagna

Béchamel Sauce:
1 tablespoon butter
1 tbsp flour
1/2 cup milk
Pinch of salt, pepper, & freshly grated nutmeg

Zucchini & Bacon 3 Cheese Lasagna

Lasagna:
1 zucchini, diced
1 tbsp olive oil
1 clove garlic, minced
1/2 tsp salt & pepper
3 ounces fontina cheese, shredded
1/2 cup Parmesan cheese, grated
6 slices bacon, cooked and cut into bite sized pieces
1 egg
1/2 tsp salt & pepper
1 cup of your favorite marinara or spaghetti sauce
3 oz smoked mozzarella cheese
4 oven ready (no boil) lasagna noodles


Directions:
Dice zucchini, add garlic, coat with 1 tbsp olive oil and season with 1/2 tsp each salt and pepper.

Zucchini & Bacon 3 Cheese Lasagna

Roast in an 8×8 baking dish at 400 degrees for 15 mins until soft. Leave oven on at 400, and save the 8×8 dish for the lasagna.

Combine the zucchini, bacon, Parmesan, fontina, egg, 1/2 tsp salt and 1/2 tsp black pepper in a medium bowl to blend. Set aside.

Zucchini & Bacon 3 Cheese Lasagna

To make the béchamel sauce: Melt 1 tbsp butter in a heavy medium saucepan over medium-low heat. Add the flour and whisk for 3 minutes. Whisk in the milk. Increase the heat to medium-high. Whisk the sauce until it comes to a simmer and is thick and smooth, about 3 minutes. Whisk a pinch of salt, pepper, and nutmeg into the béchamel sauce.

Zucchini & Bacon 3 Cheese Lasagna

Pour the béchamel sauce into the bottom of the 8×8 dish. Top with 2 lasagna noodles, the zucchini mixture, 2 more lasagna noodles, the marinara sauce, mozzarella cheese, and a little more parmesan cheese to top.

Cover tightly with foil.

Zucchini & Bacon 3 Cheese Lasagna

Bake at 400 until heated through and the sauce bubbles, about 20 minutes. Uncover and bake until the cheese on top becomes golden, about 15 minutes longer.

Zucchini & Bacon 3 Cheese Lasagna

Let stand for 10 minutes.


Makes 4 servings.

Homemade Hamburger and Hotdog Buns

Homemade Hotdog Buns

So you're having a hotdog or a hamburger and realize you don't have any store bought buns in the house?

Do you just change your plans and go for something else?  Do you run out and spend money on something you can easily whip up at home?

Homemade Hotdog Buns

Well I don't know about the rest of you, but I prefer Homemade anything....it is 10 times tastier than store bought and cheaper too, at least in my opinion.  So next time you're having hamburgers or hotdog buns, skip the store ones and just reach for the bread machine.

I've tried a few recipes but I always go back to this one from Craving Comfort.

This recipe is for Hamburger Buns, but follow it and just shape the rolls to look like Hotdog Buns when it comes to that step. :)

Homemade Hotdog Buns

Homemade Hamburger or Hot Dog Buns
(using a Bread Maker)

Ingredients
  • 1 1/4 cups milk, slightly warmed
  • 1 beaten egg
  • 2 tablespoons butter
  • 1/4 cup white sugar
  • 3/4 teaspoon salt
  • 3 3/4 cups bread flour
  • 1 1/4 teaspoons active dry yeast

Directions
(hamburger buns, if you want hot dog buns. cut 'em to that shape)

Place all ingredients in pan of bread machine, according to manufacturer's directions.Select dough setting.

Homemade Hotdog Buns


When cycle is complete, turn out onto floured surface.

Homemade Hotdog Buns

Cut dough in half and roll each half out to a 1" thick circle.

Homemade Hotdog Buns

Cut each half into six 3 1/2" rounds with inverted glass as a cutter.  Place on greased baking sheet far apart and brush with melted butter.

Homemade Hotdog Buns

Cover and let rise until doubled, about one hour. Bake at 350° for 9 minutes.

Homemade Hotdog Buns

Note: Oven temperatures vary so check after 9 minutes to see if done.

Homemade Hotdog Buns

As you can see the buns are not shaped perfectly, but that doesn't matter as long as you have long shaped buns, you're good to go. In my attempt to try different sizes until I found the right one, I ended up with extra bread rolls which are going to be delicious for breakfast tomorrow. :)

Homemade Hotdog Buns

Tuesday, June 21, 2011

Stuffed Eggplant

I love eggplant but it's one of those veggies that tend to get overlooked, a lot.  Aside from Eggplant Parmesan which is I guess the most known way to eat Eggplant, you don't really see many people talk about it....which is a shame in my eyes.

Eggplant is not only healthy but delicious so I try to find ways to incorporate it into my diet.  Today I prepared some Stuffed Eggplant, nothing fancy, nothing too complicated, just a few ingredients.  Here's how I did it:


Stuffed Eggplant

Stuffed Eggplant

3 Eggplants
1 lb ground beef
1 can tomatoes and chilies, drained
1/2 cup white wine
Salt and Pepper to taste
Paprika
olive oil
garlic cloves, diced
Small can of tomato sauce
Parmesan Cheese
Shredded Monterey Jack Cheese


Start by putting a bit of olive oil in a big skillet, about 2 tablespoons or so.  Add the diced garlic and cook for a minute or so, do not let the garlic burn.  Add the can of tomatoes and chilies, then add the ground beef and cook until meat is browned.

Add the wine, salt and pepper, paprika and small can of tomato sauce.  Cook for a few minutes to let the flavors combine.  Add some parmesan cheese to taste, stir well and then turn the heat off and set aside.

Stuffed Eggplant

Chop the top off the eggplant, then slice it lengthwise. 

Stuffed Eggplant

Scoop the eggplant insides out, cut into small chunks and then add to the meat mixture.

Stuffed Eggplant

Fill a large pot with water, bring to a boil and add the eggplant halves, cook for 10 minutes or until cooked through and tender.  Remove from the pot, drain and place in a baking dish.

Fill the eggplants with the meat filling. 

Stuffed Eggplant

Bake in a 350 degree oven for about 20 minutes, remove from oven, sprinkle with shredded monterey jack cheese and pop back in oven for another 5 minutes or until cheese has melted.  Serve immediately!

Stuffed Eggplant

Monday, June 20, 2011

Basic Crepes

Crepes.  Growing up in South Africa these were considered pancakes.  Yep, these were OUR pancakes and the pancakes we eat here in the States were considered Flapjacks.

Basic Crepes

It wasn't until I moved to the USA that I realized that what I had been eating and calling pancakes was something totally different.  No wonder my hubby used to give me a weird look when I proudly called these "pancakes" LOL

Crepes are extremely easy to make and I've made so many in my time that I have no problems, no breaking and destroying the first 4 in the skillet and no panicking.  BUT if it's the first time you're making them, they can be a little intimidating....just remember, the first few you make will no doubt fall apart, tear up or just look plain yucky.....don't stop though keep going.

Here's how I make mine, these are pretty basic, the only thing I add sometimes is a few drops of vanilla extract.  We also like ours plain with just cinnamon sugar, some whipped cream and some strawberries on top.  Yum!

Basic Crepes
Basic Crepes

INGREDIENTS

* 1 cup all-purpose flour
* 2 eggs
* 1/2 cup milk
* 1/2 cup water
* 1/4 teaspoon salt
* 2 tablespoons butter, melted


DIRECTIONS

1. In a large mixing bowl, whisk together the flour and the eggs. Gradually add in the milk and water, stirring to combine. Add the salt and butter; beat until smooth.


Basic Crepes

2. Heat a lightly oiled griddle or frying pan over medium high heat. Pour or scoop the batter onto the griddle, using approximately 1/4 cup for each crepe. Tilt the pan with a circular motion so that the batter coats the surface evenly.


Basic Crepes

3. Cook the crepe for about 2 minutes, until the bottom is light brown. Loosen with a spatula, turn and cook the other side. Serve hot.

Basic Crepes

4. We like ours pretty simple, so I just sprinkle on some sugar/cinnamon, roll up the crepe and sprinkle on a little more.


Basic Crepes

Some days like today I add a little scoop of whipped cream and some sliced fresh strawberries.

You CAN also slather on some whipped cream inside the crepe and add sliced fruit (strawberries, bananas, apples), roll it up. Variations are endless :)


Basic Crepes

Friday, June 17, 2011

Orange Jelly Roll - Torta de Laranja

I think one of my favorite Portuguese Desserts is Torta de Laranja.  It's an orange flavored Jelly Roll, without any kind of filling because it's soft and moist and just amazingly delicious.

Torta de Laranja

When you see the ingredients for this dessert you'll be surprised because there's nothing gourmet or expensive or weird hidden special item, they're all pantry staples.

Torta de Laranja

One thing to keep in mind, I have been making this dessert for many years and I have yet to have one turn out perfect, I don't know if it's because it's so moist or maybe I'm not the greatest Jelly Roll roller upper LOL  OR maybe it's a combination of both.  Not that it matters, it is really delicious whatever it may look like.

This is how you make it....

In a medium bowl mix 6 eggs, 2 and 1/2 cups of sugar, zest and juice from one orange and one tablespoon flour.  That's it.  Mix all very well.

Torta de Laranja

Torta de Laranja

Line a jelly roll pan with parchment paper, pour the mixture into the pan and bake at 400 degrees for about 8 to 10 minutes until the cake is golden and springs back when lightly touched.

Dust a dishtowel with sugar.  I'm using one of my favorites, it's actually from Madeira and I just love it, makes me smile everytime I see the two figures dancing having actually seen these dances up close and personal.  :)

Torta de Laranja

When cake is done invert pan onto towel, trim off the edges and then roll the cake up.  Place in the refrigerator for about 30 minutes.

Torta de Laranja

This cake is best when it's nice and cold.  Dig in and enjoy :)

Torta de Laranja

Creamy Chicken Enchiladas - Version 2

Creamy Chicken Enchiladas

I already have another recipe on this blog for Best Creamy Enchiladas, but this is a different version, this is my go to recipe when I want chicken enchiladas without using too many ingredients.

I'll keep this one short and go right to the recipe.

Creamy Chicken Enchiladas

Creamy Chicken Enchiladas


1 tbsp butter
1 small onion, finely diced
1 can tomatoes and green chilies, drained
1 (8 oz) pkg cream cheese, cut up and softened
3 cups cups chopped, cooked chicken breast
8 (8″) flour tortillas
2 cups shredded Monterey Jack cheese
2 cups whipping cream


Directions
Melt butter in large skillet over medium heat. Add onion and saute for 5 mins.  Add tomatoes and green chilies and cook for another minute or two. Stir in cream cheese and chicken, cook for a few minutes while stirring constantly until cream cheese melts.

Creamy Chicken Enchiladas

Spoon 2 or 3 tablespoons of chicken mixture down center of each tortilla.  What I like to do is actually divide the mixture in the pan according to how many tortillas I have.

Creamy Chicken Enchiladas

Roll up tortillas and place seam side down in a lightly greased 9×13 baking dish.

Sprinkle with cheese,

Creamy Chicken Enchiladas

and drizzle with whipping cream.

Creamy Chicken Enchiladas

Bake at 350 degrees for 45 minutes.

Creamy Chicken Enchiladas