I've been meaning to add more Instant Pot recipes to the blog, but I haven't had a chance to update it or get back into my usual posting.
Two Christmases ago, my husband got me this instant pot which he knew I had been wanting. Seemed to be all the rave at the moment and to be frank, I wanted one but was very intimidated by the thought of using it in my own kitchen.
My run ins with pressure cookers were in my greatgrandmother's kitchen. That huge metal thing would sit on the stove and whistle loudly, the little pressure valve quickly snapping back and forth. It terrified me. It didn't help that I would hear horrible stories of pressure cookers blowing up in the kitchen.
But I also knew the perks and advantages of having one and now that they are electric and pretty much do their own thing, I decided it was time to bite the bullet and go for it.
I am so glad I did, I use it a lot, and it's become a wonderful addition to my kitchen.
I'm hoping to add a few more recipes here as I try them, but I thought I would share how to make boiled eggs, especially with Easter right around the corner, knowing that we are all going to be making a ton of these for deviled eggs and decorating with the kids etc.
So here's how you do it. I placed my metal rack on the bottom, and then sat the eggs on top. You don't want the eggs to touch the bottom of the bowl.
Add 1 cup of water, and then set it on the rice setting for 9 minutes.
I've seen online where some people use their rice setting and turn it to 6 minutes, but my pressure cooker won't let me go below 9 so I went with it and it worked perfectly.
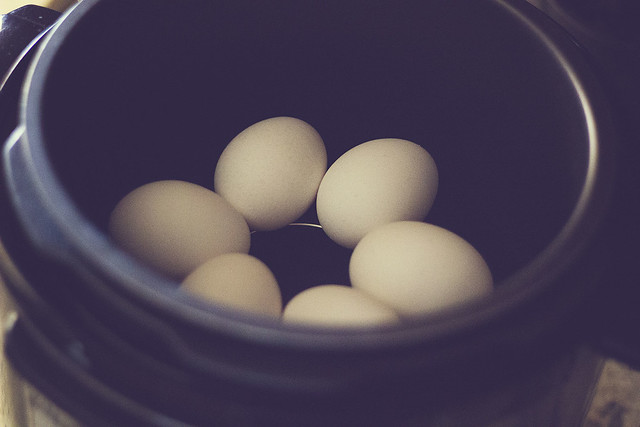
As soon as the eggs were done, I used the quick steam release, and dumped them into a bowl of ice cold water. You DON'T have to use the quick steam release, you can just let the instant pot release the pressure on it's own.
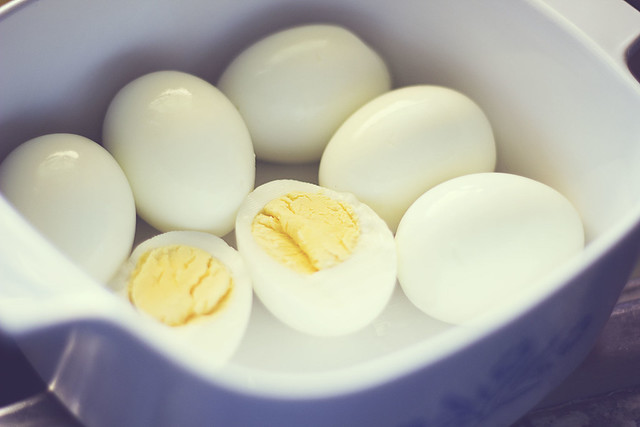
They peeled off so well and were cooked to perfection as you can see below.
I'm trying some decorating techniques for Easter today, so at the moment I have another batch of eggs going in the instant pot. This is going to make Easter so much easier :)
Thursday, March 30, 2017
Tuesday, February 07, 2017
Sourdough Cinnamon Rolls
Sourdough bread is one of those things that I enjoy but don't always make, maybe because it involves having the sourdough starter and I don't remember to make it that often.
But once in a while, I get one going and then just keep it in the fridge and make bread and cinnamon rolls until it runs out. Now you can keep feeding it, of course, but after about a week I'm done using mine and just prefer to restart again a few months later.
Last week I quickly threw together a starter, fed it and left it in my fridge. I made a loaf in the bread machine, and then two days ago I started a sourdough bread and cinnamon roll dough.
I've shared the recipe for the sourdough starter and bread before, but here is the recipe for the cinnamon rolls. This recipe is from one of my Amish Cookbooks, which I absolutely adore.
Enjoy!!!
Sourdough Cinnamon Roll
Makes 24 large rolls
Sourdough bread dough, prepared through first rise
6 tablespoons of butter or margarine, softened
1 cup packed brown sugar
3 teaspoons ground cinnamon
ICING
1/3 cup margarine or butter, softened
1 teaspoon vanilla extract
4 cups sifted powdered sugar
1/2 cup milk
After the dough has risen overnight, punch it down and divide in half, form two dough balls.
Take one ball of dough and roll it out as thin as you can on a floured surface. Brush the dough with half of the melted butter. Sprinkle half of the sugar and half of the cinnamon.
Roll up like a jelly roll, then cut each roll into 1/2 to 3/4 inch slices. Place slices 1/2 inch apart in a greased jelly roll pan, cover with waxed paper. Repeat with the second ball of dough. Then let both rise for 4 hours.
Preheat oven to 350 degrees. Bake until golden brown about 20 minutes. Remove from oven and let cool slightly.
For the icing, mix butter with vanilla and 1 cup of powdered sugar. Gradually add milk and remaining powdered sugar until smooth. Drizzle over the rolls.
Monday, January 23, 2017
Slow Cooker Butternut Squash and Lentil Soup
It's been so chilly around here lately, the perfect weather for a bowl of steaming hot soup.
I actually made this batch for myself, to have during the week for a quick lunch, because I'm trying to eat healthier and get to where I was pre-holidays.
This is a very easy soup to get going, you can pop everything in, in the morning, then let it cook on low all day long. I give it a quick whiz with the immersion blender and it's done.
My husband and children are not very big fans of butternut squash, so I really do make this just for myself to enjoy, and it last quite a while because it makes a pretty big batch.
Thank you to Claire from The Witt Family on Youtube for this wonderful recipe.
Slow Cooker
Butternut Squash and Lentil Soup
1 Butternut Squash
1 Large Onion, diced
2 to 3 Garlic cloves, chopped
Salt & Pepper to taste
2 tsp smoked paprika
1 cup lentils
1 vegetable stock cube
3.5/4 cups of boiling water ( I used a box of Garden Vegetable Broth, 32 oz. )
Peel butternut squash, cut in half and remove all seeds. Cut into chunks and place in a slow cooker. Add the diced onion, garlic and season well with salt and pepper and paprika. Add in the cup of lentils, and the vegetable broth. Cover and cook on Low for 6 to 7 hours.
Once done, use an immersion blender to puree the soup. Check the seasonings and adjust accordingly. Enjoy!!!
Wednesday, January 11, 2017
Crockpot Smothered Pork Chops
We love pork chops but I tend to get kind of stuck in a rut when it comes to preparing them. It feels like it's always the same old thing, and so I've been looking for new recipes to try.
I came across this one on Pinterest and decided to give it a go. I'll be completely honest with you, I don't always have the best of luck with Pinterest, it's kind of a hit and miss for me. Things that seem really good don't always turn out how they look in the pictures, or they don't taste as good as I thought they would etc.
These were a hit. From the moment they started cooking, the whole house smelled amazing. Very easy to throw together and they make for a filling and delicious dinner.
I did use bone in but they completely fell off the bone, which is a very good thing. But yes, please make sure you have pretty thick chops, I don't think the pork tenderloin chops would work very well, they would probably shred apart during cooking.
4 bone-in pork chops (or boneless)
1 envelope onion soup mix (1 oz. packet)
1 (14 oz.) can chicken broth (lower sodium)
1 can (10.5 oz.) cream of chicken soup
1 envelope dry pork gravy mix (1 oz. packet)
1 tsp. garlic powder
to thicken sauce:
3 tbsp. corn starch
3 tbsp. cold water
In a 5-6 quart oval slow cooker, combine onion soup mix, chicken broth, cream of chicken soup and pork gravy mix.
Whisk together until combined.
Season both sides of the chops with a little bit of garlic powder.
Place pork chops into the slow cooker.
Do your best to spread them out and cover with the gravy mixture.
Cover and cook on low about 4-6 hours.
Just before the pork chops are done - whisk together the corn starch and cold water in a small bowl. Once it is smooth, pour it in with your pork chops in the slow cooker and stir gently.
Cover and switch the slow cooker to high and cook for another 30 minutes (until gravy has thickened.)
I came across this one on Pinterest and decided to give it a go. I'll be completely honest with you, I don't always have the best of luck with Pinterest, it's kind of a hit and miss for me. Things that seem really good don't always turn out how they look in the pictures, or they don't taste as good as I thought they would etc.
These were a hit. From the moment they started cooking, the whole house smelled amazing. Very easy to throw together and they make for a filling and delicious dinner.
I did use bone in but they completely fell off the bone, which is a very good thing. But yes, please make sure you have pretty thick chops, I don't think the pork tenderloin chops would work very well, they would probably shred apart during cooking.
CROCKPOT SMOTHERED PORK CHOPS
Source: Country Cook
4 bone-in pork chops (or boneless)
1 envelope onion soup mix (1 oz. packet)
1 (14 oz.) can chicken broth (lower sodium)
1 can (10.5 oz.) cream of chicken soup
1 envelope dry pork gravy mix (1 oz. packet)
1 tsp. garlic powder
to thicken sauce:
3 tbsp. corn starch
3 tbsp. cold water
In a 5-6 quart oval slow cooker, combine onion soup mix, chicken broth, cream of chicken soup and pork gravy mix.
Whisk together until combined.
Season both sides of the chops with a little bit of garlic powder.
Place pork chops into the slow cooker.
Do your best to spread them out and cover with the gravy mixture.
Cover and cook on low about 4-6 hours.
Just before the pork chops are done - whisk together the corn starch and cold water in a small bowl. Once it is smooth, pour it in with your pork chops in the slow cooker and stir gently.
Cover and switch the slow cooker to high and cook for another 30 minutes (until gravy has thickened.)
Apple Blondies
Imagine if you will, you have an apple, and you throw it into a doughy brownie like batter, pop it into the oven and out comes the unmistakable taste of Apple Pie.
Yeah, something like that.
I know it's not exactly Fall and some people tend to only gravitate towards these kind of desserts, when it's around that season, but for me, food is about eating and enjoying, any time of the year, so I don't even think twice about making some apple cinnamon concoction in Winter, or Summer, or having ice cream in the cold months. It is what it is :)
I'm going to start by saying that I'm trying to lose some weight, it's not much, about 5 pounds that I seem to inherited from Thanksgiving and Christmas (thank you good food and wine). This recipe is everything I shouldn't be eating, but I am not one to diet completely, I can't do that, I always lose weight by controlling portions and not over doing certain things, without having to give up the food I love.
I will probably only have one of these, just enough to curb that sweet tooth craving, but I'm pretty certain my husband and children will enjoy the rest :)
1/2 cup butter, melted
1 cup packed brown sugar
1 cup white sugar
2 eggs
2 teaspoon vanilla extract
1/2 teaspoon ground cinnamon
1/2 teaspoon salt
2 teaspoon baking powder
2 cups sifted all-purpose flour
1 cup apples, diced (a tart baking apple is best like granny smith)
1 cup chopped walnuts (optional)
2 Tablespoons white sugar
2 Tablespoons cinnamon
Preheat oven to 350 degrees F. Spray a 9 x 9 square dish with cooking spray.
In a bowl, mix together butter, brown sugar & 1/2 cup white sugar.
Add egg, vanilla, cinnamon, salt & baking powder, mix well.
Add flour and mix again. Batter will be thick, don't worry!
Add apples and walnuts if desired and mix well. Batter should begin to thin to more brownie like consistency.
Spread mixture evenly into prepared pan.
In a small dish, mix 2 Tablespoons sugar and 2 Tablespoons of cinnamon. Sprinkle on top of apple mixture.
Bake for 45 minutes or until brownie consistency then remove from oven.
Allow to cool. Once cooled, cut into bars and devour immediately by itself or with a large scoop of ice cream!
Yeah, something like that.
I know it's not exactly Fall and some people tend to only gravitate towards these kind of desserts, when it's around that season, but for me, food is about eating and enjoying, any time of the year, so I don't even think twice about making some apple cinnamon concoction in Winter, or Summer, or having ice cream in the cold months. It is what it is :)
I'm going to start by saying that I'm trying to lose some weight, it's not much, about 5 pounds that I seem to inherited from Thanksgiving and Christmas (thank you good food and wine). This recipe is everything I shouldn't be eating, but I am not one to diet completely, I can't do that, I always lose weight by controlling portions and not over doing certain things, without having to give up the food I love.
I will probably only have one of these, just enough to curb that sweet tooth craving, but I'm pretty certain my husband and children will enjoy the rest :)
The recipe comes from Allrecipes. I changed it slightly in that I doubled the ingredients and used a 9x13 instead, aside from that everything is the same.
Apple Blondies
1/2 cup butter, melted
1 cup packed brown sugar
1 cup white sugar
2 eggs
2 teaspoon vanilla extract
1/2 teaspoon ground cinnamon
1/2 teaspoon salt
2 teaspoon baking powder
2 cups sifted all-purpose flour
1 cup apples, diced (a tart baking apple is best like granny smith)
1 cup chopped walnuts (optional)
2 Tablespoons white sugar
2 Tablespoons cinnamon
Preheat oven to 350 degrees F. Spray a 9 x 9 square dish with cooking spray.
In a bowl, mix together butter, brown sugar & 1/2 cup white sugar.
Add egg, vanilla, cinnamon, salt & baking powder, mix well.
Add flour and mix again. Batter will be thick, don't worry!
Add apples and walnuts if desired and mix well. Batter should begin to thin to more brownie like consistency.
Spread mixture evenly into prepared pan.
In a small dish, mix 2 Tablespoons sugar and 2 Tablespoons of cinnamon. Sprinkle on top of apple mixture.
Bake for 45 minutes or until brownie consistency then remove from oven.
Allow to cool. Once cooled, cut into bars and devour immediately by itself or with a large scoop of ice cream!
Subscribe to:
Posts (Atom)