Tuesday, November 01, 2022

The Golden Girls Cookbook by National Geographic - TLC Book Tours


About National Geographic’s The Golden Girls Cookbook: Cheesecakes and Cocktails!

 Publisher: National Geographic (September 13, 2022)
Hardcover: 160 pages

Containing over forty new dessert and drink recipes from Blanche, Rose, Dorothy, and Sophia, this follow-up to the first The Golden Girls Cookbook will make you feel like you’re relaxing on the lanai or getting set to win the Shady Pines bake-off.

Fans demanded more Golden Girls cheesecake recipes, and the Fab Four deliver with The Golden Girls Cookbook: Cheesecakes and Cocktails! Rose’s The Fall of St. Olaf Pumpkin Cheesecake and Dorothy’s Vodka and Black Underwear drink vie for your heart (and stomach) against Sophia’s Double Fudge Amaretto Ricotta Cheesecake and Blanche’s Big Daddy Mint Julep. With easy-to-follow tips, you’ll learn how to make your cheesecake the star of any kitchen table and your drinks something talk about over, well, drinks.

And if that’s not enough, Sophia’s guide to Caffè Corretto will make the rest of your day very correct-o. Welcome to 6151 Richmond Street, circa 1985, where joy and friendship abound, and the cheesecake is always ready for a late-night therapy session.

Filled with innovative recipes by renowned chef Christopher Styler, and beautiful photos by New York Times food photographer Andrew Scrivani–plus fun quotes, jokes, and photographs from the show–this is a must-have for all fans of The Golden Girls.


My thoughts:
What a fun cookbook to add to my collection.  
 
If you know me, you know that I am obsessed with cookbooks and cooking, hence my food blog along with this main one.  When I got the opportunity to review this cookbook, I was so excited, not just for the recipes within in, but I am such a huge Golden Girls fan.
 
My childhood revolved around The Golden Girls, I remember watching the show as a teenager.  My favorite was always Sophia, I mean, who didn't love the feisty old lady Hahahah  And then Dorothy, of course.  I didn't dislike Rose or Blanche, but Sophia and Dorothy were my favorites. 

I got the cookbook in the mail and immediately browsed through it.  I thought it would be just recipes but it's not, it has sections divided by the different ladies in the show, and each contains funny tidbits, along with recipes for cheesecakes and cocktails.  I mean, what is there not to like?

There are also cast and show photos, with little stories and even dialogue between the characters.  It was so much fun to read through, and the recipes?  Oh my.


I have many that I'll be trying, but I asked my kids to pick one for me to make first, and they both picked the Key Lime Pie Cheesecake Squares.  They were not only super easy to make, didn't use many ingredients, but oh my word, they are divine.  


If you love cookbooks, love The Golden Girls, love cocktails and just want a really cool cookbook to add to your collection, or to gift over Christmas, this is definitely one to get.
 
Thank you to TLC Book Tours and National Geographic, for providing me with a copy for review.


Monday, October 31, 2022

Menu Plan for October 31st to November 6th

Good morning everyone.
 
It is Monday, and that means a new week of meals is before us.  Now, I haven't posted this in a really long time, but with the prices being so high lately, I've started being a lot more conscious of what I'm making, using what I have on hand, and trying to eat at home as much as possible.
 
We have never been a family that eats out a lot, just the occasional take out on payday.  But, the prices of take out are ridiculous at the moment, so when we have a craving for something, I try to make it at home as well.
 
With that in mind, I am cooking from my fridge and freezer the next two weeks, and really trying to use what is already available.  Here is this week's meal plan, and I'll be back next week with the new one for that week.


Monday October 31st
Breakfast:   Coffee, Toast with butter and liver spread
Lunch:   Clam Chowder, Oyster Crackers
Dinner:   Best Chili Ever, Rice, Homemade rolls


Tuesday November 1st
Breakfast: Instant Pot Oatmeal, Coffee
Lunch: Leftover chili
Dinner: Million Dollar Gnocchi, Salad, Garlic Bread


Wednesday November 2nd
Breakfast: Pancakes, Orange Juice, Coffee
Lunch: Salad
Dinner: Cracker Barrel Hamburger Steak, Mashed Potatoes, Broccoli


Thursday November 3rd
Breakfast: Toast with Apple Butter, Coffee
Lunch: Tuna salad
Dinner:  Bifanas (pork sandwiches), Air Fryer Potato Wedges


Friday November 4th
Breakfast: Cinnamon Toast
Lunch: Grilled Cheese and Tomato Sandwich
Dinner:   Copycat Uno's Pizza


Saturday November 5th
Breakfast: Scrambled Eggs, Toast
Lunch: Leftover pizza
Dinner:  Breakfast for dinner - biscuits and gravy, hashbrown casserole


Sunday November 6th
Breakfast: Sausage Biscuits, Coffee, Juice
Lunch: Frozen Pizza
Dinner:   Onion and Potato Soup, Grilled Cheese Sandwiches

Thursday, September 22, 2022

Fluffy Hamburger Buns

 
IMG_4020

 
Imagine if you will, a light and fluffy hamburger roll that reminds you of store bought buns, but were made right in your home.  That is what I am bringing you today.  I am sharing these amazing, fluffy, delicious hamburger buns, from Alyona Demyanchuk.   I have made many a hamburger buns over the years, but none have ever been so light and fluffy, and so close to store bought, as these are.  They are going to be my go to burger bun.
 
At first, I thought about cutting the recipe in half, since this recipe makes 32 buns, but I decided to go ahead and make the full recipe and just freeze half of them for a later day.  Although, I did have them this morning with some ham and cheese, for breakfast, and they are so yummy.  So, so good.

I hope you enjoy them as much as we did.
 
 
IMG_4026

Fluffy Hamburger Buns
Yield: 32 rolls 


Ingredients 
Dough: 
 
2 cups warm water 
4 Tbsp dry yeast 
1/2 cup sugar 
1 Tbsp salt 
2 eggs 
1/2 cup shortening 
6 1/4 cup flour 
 
 
Instructions 
How to Make Hamburger Buns: 
 
 
In a large mixing bowl, dissolve the yeast in warm water. Whisk in the sugar, salt, eggs, and shortening. Stir in the flour and knead 7 minutes. Let rise 30 minutes or until doubled. 
 
Cut dough in half and then cut each half into 16 equal pieces. Roll all 32 pieces into balls and place onto a cookie sheet about 2-inches apart (9 rolls fit into a large 18x13 cookie sheet.) 
 
Let buns rise in the cookie sheet until tripled in size or the size of a hamburger bun. 
 
Bake at 350° for 10-12 minutes on the lower rack of the oven.


IMG_4023

IMG_4030
 

Thursday, September 15, 2022

Slow Cooker Pecan Pie

 
Today I am bringing you a recipe that I just recently tried myself, and it was a huge hit.  As with all new recipes, there are things I often have to change for the next time I make it.  

IMG_3887

 
With regards to this slow cooker pie, I need to keep an eye on it, and probably cut down the cooking time slightly, because some of the edges of the pie were a bit dark and hard from the filling.

Aside from that, this was so good, sooooo good, and I think it will be going on my Thanksgiving menu.  I have a pumpkin pie one to try as well, in the slow cooker, and if that one turns out good as well, then it will go on the menu right alongside the pecan pie.

If anything, the fact that it is cooked in the crockpot, and I don't need to faff over it, is a huge plus.


IMG_3888

Slow Cooker Pecan Pie 
 Source:  The Country Cook
 
 
Ingredients 
1 refrigerated pie crust 
4 large eggs, lightly beaten 
1 ⅓ cups light corn syrup 
 1 cup sugar 
⅓ cup salted butter melted
 ⅛ teaspoon cinnamon (optional) 
2 teaspoons vanilla extract 
2 cups pecan halves, divided use 
 
 
Instructions 
 
Line a 6-quart oval slow cooker with parchment paper (12.5 inch x 16 inch). Press the paper down into the slow cooker to create an outline of the bottom of the slow cooker. Remove parchment paper and place unrolled pie crust onto the parchment paper (lining it up with the creases from the outline in the parchment paper). 
 
Gently roll up the edges of the pie crust and make small indentations to help the crust stick to the parchment paper and to keep in the filling better. Place parchment paper/pie crust into slow cooker (pastry should extend 2 to 3 inches up the sides). Bend and fold the pastry as needed to get it to fit properly. In a bowl combine the eggs, corn syrup, sugar, melted butter, cinnamon and vanilla. Whisk until smooth. Stir in 1 cup of the pecans. 
 
Gently pour batter into crust in the slow cooker. Then top with remaining cup of pecans. Placing them evenly in a pattern to make a nice presentation. Place a layer of paper towels on top of the slow cooker then cover with the lid. Cook on high for 3 to 3 ½ hours or until filling is puffed and set. Turn off slow cooker. Let stand, uncovered, 1 hour. 
 
Cut and serve straight from the slow cooker. Or gently lift the parchment paper out of the slow cooker, then slice and serve. 
 
IMG_3890

IMG_3893


Thursday, September 08, 2022

{ Toucinho do Ceu }

Today I am bringing you a Portuguese recipe, well, Brazilian, so from my paternal grandfather's side.  This is one of the easiest desserts you will put together, but it is so good, like so so soooooo good.  It tastes phenomenal.
 
So what about that name?  What does it mean?  Well if we are to directly translate from Portuguese, it means Bacon from Heaven!  
 
I don't know why that name came about, or who decided that was the perfect name for this cake, but I'm good with it, since I love bacon, and this dessert is Heavenly.  Kinda makes sense then doesn't it?

However you may feel about the name, this is the perfect dessert when you have company come over and need something to serve.  Just a few ingredients, a quick blend together and that's it.
 
I hadn't made it in a really, really long time, and when I saw one of my favorite Youtubers making it, the craving kicked in.  So thank you to Greice Brigido for the recipe, and a trip down memory lane.

 
IMG_3804

It is a cake/pudding/tart kind of dessert, all thrown together in the blender and then baked to create this creamy interior and a little coconut crunch crust.  Just trust me, make it, you will love it.

IMG_3806

Toucinho do Ceu


Ingredients
600 ml milk
4 eggs
2 cups of sugar
1 cup of flour
3 tablespoons of butter
100 gr coconut


Directions
Put all the ingredients in a blender, and mix until well combined.  Pour into a 13x9 greased baking dish, and bake at 375 for 30 minutes or until golden brown, and the center is set.

Remove, let cool and serve immediately.

You can place it in the refrigerator and it will keep for a few days, although it never EVER lasts that long in my house.

Enjoy!

IMG_3808


Monday, August 29, 2022

Macaroni and Cheese Meatloaf Casserole

IMG_3662

 
Ok, so macaroni and cheese is delicious, and meatloaf is delicious, but what if you join these two in one pan? When I first heard of this casserole, I must admit that I was quite intrigued and not sure if it would work. 
 
So I saved the recipe, and last night, I made it for dinner. I was so worried that the meatloaf would not cook properly and that we would end up with raw meat, which is never a good thing. But, it cooked perfectly, and then topped with the creamy macaroni and cheese, it turned out to be one of the yummiest casseroles my family has ever had. 
 
So good, so easy to make, it was enough for us to enjoy at dinner, for the hubby and daughter to take to work, and there is just a little left over, because my 19 year old son scarfed it down sometime during the night.
 
 
 IMG_3663

 
I am thinking you could do your favorite meatloaf recipe for the base, and then your favorite macaroni and chese recipe as well for the topping, although, the original recipe is DELICIOUS as is. 
 
The recipe is from the blog, This is NOT Diet Food. I chuckled at the name because that is right up my alley, I know I need to watch what I eat, but friends, this is one of those meals that you have to throw caution to the wind, scarf it up and enjoy every single bite....no regrets. 
 
 
IMG_3665

Macaroni and Cheese Meatfloaf Casserole 


Ingredients 
1 cup ketchup 
1 cup Sweet Baby Ray's Hickory & Brown Sugar barbecue sauce 
2 lbs lean ground beef 
30 Ritz Crackers 
2 oz Lipton onion soup mix 
2 eggs 
3 cups macaroni noodles 
2 cups milk 
10.5 oz condensed cheddar cheese soup 
1 tsp salt 
1 tsp pepper 
1 tbsp garlic powder 
1 tbsp onion powder 
4 cups shredded mozzarella and cheddar cheese blend 
 
 
Instructions 
 
Preheat oven to 350F. Dump ketchup and barbecue sauce into a medium mixing bowl and stir until well combined. Set aside. Dump ground beef into a large mixing bowl. Place Ritz crackers in a large Ziploc bag and use a rolling pin to crush them. Pour the cracker crumbs into the bowl with the ground beef. 
 
Add the onion soup mix and eggs to the bowl with the ground beef. Add 1/2 cup of the ketchup and barbecue sauce mixture to the bowl with the ground beef. Use your hands to mix all of the ingredients together until fully combined. 
 
Dump the meatloaf mixture into a greased 9 x 13 inch baking dish and press it out evenly. Spread the rest of the ketchup and barbecue sauce mixture on top of the meatloaf. Place the dish in the oven and bake the meatloaf for 30 minutes. 
 
While the meatloaf is in the oven, cook the macaroni noodles according to the directions on the package and then drain. Pour the milk and cheddar soup into a large mixing bowl. Whisk until no lumps remain. Add the salt, pepper, garlic powder and onion powder to the bowl and whisk well again. 
 
Add the cooked macaroni noodles to the bowl and stir until all of the noodles are coated in the liquid. Add 2 cups of the shredded cheese to the bowl and stir well again. Once the meatloaf has baked for 30 minutes, remove it from the oven. 
 
Pour the macaroni mixture on top of the meatloaf and spread it out evenly. Sprinkle the remaining 2 cups of shredded cheese on top of the meatloaf. Return the dish to the oven and bake until the cheese on top is completely melted and just starting to brown. 17-20 minutes. 
 
 Remove the casserole from the oven and leave it to sit for a few minutes before slicing and serving. 
 
 Enjoy! 
 
 
IMG_3667

Cowboy Casserole

IMG_3639


Cowboy Casserole. 
 
I have a similar recipe already on the blog, and it is equally as good, but this one just kicked it up one notch.  I found the recipe over at Restless Chipotle, and knew my family would really enjoy this version.
 
It uses staple ingredients already in your pantry, it comes together quick, and 30 minutes later you have the perfect weeknight meal, ready to fill tummies.  I've always been a fan of one pan casseroles, not just for the easy clean up, but they truly do embody the concept of comfort food.
 
IMG_3641
 
 
You can adapt this recipe for the slow cooker too, by layering the ingredients, and cooking on LOW for 6 hours.  Be sure to spray your slow cooker before hand.  
 
 
Casseroles you may enjoy:

IMG_3642

Cowboy Casserole
 
 
Ingredients 
 
32 ounces Tater Tots 
1 pound ground beef 
1 cup onions and peppers mix from the frozen section 
10 ounces Ro*Tel tomatoes 
2 cups corn kernels 
10.5 ounces cream of mushroom soup undiluted 
2 cups Cheddar shredded 
1 cup sour cream
 
 
Instructions 
 
Place Tater Tots in a greased pan and put them in a 425F oven for about 5 minutes. Remove from the oven and set aside. Add the ground beef and onions & peppers mix to a skillet. Cook until the meat is no longer pink. 
 
Add the Ro*Tel and simmer for 5 minutes to let the extra liquid evaporate. Remove from heat and stir in sour cream, cream of mushroom soup, corn, and ½ cup of cheese. Stir until blended. Spoon into the bottom of a greased 13x9 inch baking dish. Sprinkle with ¾ cup of the remaining cheese. 
 
Top with the Tater Tots, arranging them in a single layer. Cover with the remaining cheese. Cover the pan with aluminum foil. You can stop at this point and put the casserole in the refrigerator for up to 3 days. Bake at 425F for 20 minutes. Remove aluminum foil. Bake 10 more minutes, or until the top is golden brown. 
 
Serve hot.
IMG_3638

Slow Cooked Creamy Chicken Chili

IMG_3622

As our temperatures start dropping, my mind immediately shifts to Fall and Winter cooking, although to be honest I am a person who eats whatever she wants, whatever time of the year.  Soups in July?  Yes!

Chili in the middle of August?  Why not?

This chili comes together using very few ingredients, but still makes for a delicious filling meal.  I paired it with homemade corn bread and some tortilla chips, and it was a meal that the whole family enjoyed.
 
IMG_3620

Slow Cooked Creamy Chicken Chili


Ingredients

2 boneles sskinless chicken breasts
1 (11-oz) can corn, drained
1 (15-oz) black beans, drained and rinsed
1 (10-oz) diced tomatoes and green chilies, undrained
2 cups chicken broth
1 cup cooked chopped bacon
1 (1-oz) packet ranch seasoning & salad dressing mix
1 tsp cumin
1 Tbsp chili powder
1 tsp onion powder
1 (8-oz) package cream cheese
1 cup shredded cheddar cheese


Instructions

Add chicken to the slow cooker, then top with the remaining ingredients.  I break the cream cheese into smaller chunks before stirring it in. 

Cook on LOW for 8 hours.
 
When done, break the chicken into smaller chunks, or shred if you prefer.  Serve with sour cream, green onion, shredded cheese or any other topping you wish.  


Copycat Starbucks Banana Bread

Today, I am sharing the recipe for a copycat Starbucks Banana Bread.  It is so good.  What I love about it, is that it's just the perfect combination, it's not overly sweet,  and it's also really easy to make.

If you have bananas that you need using up, this is the perfect recipe.  Now I know we all have a ton of banana bread recipes, I think it's probably one of the most made recipes all over the world.  I myself have quite a few, even posted here on the blog, but it never hurts to have one more right?

Give this one a try and let me know what you think, it's become my go to banana bread.

Recipe comes from My Frugal Adventures.
 
 
IMG_3637

Copycat Starbucks Banana Bread


Ingredients 
 
2 cups flour 
1 teaspoon baking soda 
 ¼ teaspoon salt 
1 egg 
1⅛ cup sugar 
 ½ cup vegetable or canola oil 
 2 tablespoons buttermilk or milk 
½ teaspoon vanilla 
3 bananas mashed very well 
 ½ cup chopped walnuts (optional) 
 
 
Instructions 
 
Preheat oven to 325 degrees. Add flour, baking soda and salt to a small bowl and set aside. Mix egg, sugar and oil and stir until well combined 
 
Add the dry ingredients to the wet and stir well. The mixture will be thick and dry. Next add milk, vanilla and bananas and stir until incorporated. 
 
Mix in walnuts and pour into a loaf pan. 
 
Cook 50-75 minutes, checking regularly until a knife comes out clean. 
 
 
IMG_3636

Thursday, August 18, 2022

Orange Ricotta Cake

IMG_3403
 
I've been looking through all my old recipes and cookbooks.  If you didn't know, I am obsessed with cookbooks or all shapes and kinds, magazines, church cookbooks....you name it.  

I've amassed quite the collection, enough that I often forget what I have, so it's fun to go back and look.  It's during those moments, that I seem to find the best recipes, the ones that are not only delicious but tried and true, passed down from generation to generation, and the pure definition of comfort food.
 
 IMG_3407

This Orange Ricotta Cake is so unbelievably good.  It may seem like a simple cake, but the flavor packs quite a punch and if you're worried about the Ricotta cheese, don't, you won't even notice it's there, aside from giving the cake a soft and fluffy texture.

I am not a fan of very rich, full of frosting, kind of cakes, I much prefer simple cakes.  They are perfect with a cup of coffee or tea.  So this one, is what I would call one of my favorites, and I do hope you enjoy it too.

IMG_3404

Orange Ricotta Cake

 
3/4 cup of butter
1 and half cups of sugar
15 oz Ricotta cheese (425 Gr) 
3 large eggs
1 and half cups of flour
Zest and juice from one orange
1 teaspoon vanilla extract
1 teaspoon ground cinnamon
1 teaspoon baking soda
1/2 teaspoon of salt


Preheat oven to 350 degrees.

Beat the butter and sugar until creamy and pale yellow.  Add in the eggs one at a time.  Next add the ricotta, the flour, zest and juice from one orange, vanilla, cinnamon, baking soda and salt.  

Mix until well combined.

Pour into a greased and floured cake pan.  (I used my 9 inch springform pan).  Bake at 350 for 45 to 50 minutes, until golden brown and a toothpick inserted in center, comes out clean.

Let cool completely, remove from cake pan and dust with powdered sugar.

Monday, August 08, 2022

Frango no Churrasco - Barbecued Chicken

IMG_3142

There are some meals that you have a specific memory associated with. For me, grilled chicken is one of those. But not just grilled chicken, I'm talking about the Frango no Churrasco.  A barbecue chicken that is beyond delicious, grilled to perfection, with the perfect amount of seasonings and just a little kick from piri piri (chilies).

In Portugal, we have a lot of little corner shops, called Churrasqueiras, that sell these divine barbecue chickens.  I used to go with my dad and brothers, on the weekends, down to our local churrasqueira in Sao Joao do Estoril, and we would get a chicken and some kettle cooked chips to go with, or a large order of fries and a salad.

To this day, Frango no Churrasco is one of my favorite of favorite ways to barbecue chicken.

It does take a bit of time, it needs to grill over about an hour to an hour and a half, and needs to basted, every 15 minutes or so.  Basically, I am out there turning the chicken every 15 minutes, and basting it.  It's time consuming, but well worth the effort.

IMG_3140


Frango no Churrasco


Ingredients for the chicken and marinade:
1 whole chicken, flattened and cleaned
2 garlic cloves, diced
1 tablespoon olive oil
Massa de pimentao (red pepper paste, but you can omit if you don't have)
1 whole dried chili pepper, crushed (or 1teaspoon of cayenne pepper)
Salt to taste
 

For the basting sauce:
50 ml vegetable oil
1 teaspoon of crushed red pepper flakes
1 teaspoon red pepper paste
2 garlic cloves, diced
25 ml beer (you can also use wine)
black pepper to taste
Juice of half a lemon
1 bay leaf
salt to taste


Instructions:
Make the basting sauce, by mixing all the ingredients together, and then set aside.
 
IMG_3138

IMG_3139


Clean the chicken, open it up and butterfly it.  It needs to be flat.  Mix the ingredients for the marinade and rub all over the chicken.  Set chicken in fridge to marinade, for at least an hour.  The longer it sits, the better it will be.

Cook over hot coals, turning every 15 minutes, and basting each time you turn.  When the chicken is evenly cooked, and nice and charred, remove and serve immediately.  Cut into smaller portions and serve with homemade fries and a salad.

If cooking on a gas grill, like I did.  Turn on the grill and set each burner to maximum. Keep lid closed and let it preheat for about 20 minutes on high heat, it should reach 400 degrees.  Then turn all the burners down to a low heat.
 
You can place the chicken directly on the grates, but I prefer to put it in a grilling basket with a handle.  
 
IMG_3136

 Set it on the grill, close it, and then every 15 minutes, flip the basket and baste the chicken. 

IMG_3137

Torta de Liquidificador - Chicken Blender Pie

IMG_3376

This is one of those recipes that can be used with various fillings.  The most popular is the chicken, but you can also do beef, sausage, or whatever you have on hand.  I bet it would be delicious with a fish filling as well.

Usually on the weekends, we either eat leftovers, or each one does whatever they want, or I make a very quick, meal.  It's always something along the lines of a sandwich or pizza and so forth.

This pie, is something that I love making when I have leftover chicken.  The filling itself is up to you, some make it with a tomato based sauce, I prefer a cream base, but it's totally up to whoever is making it.

The Torta de Liquidificador, is very popular in Brazil, where my great grandparents were from.  Give this one a try, and let me know what you think.

As always, keep in mind that I eyeball ingredients when I cook, so aside from the blender dough mixture, which I'll give you the correct ingredients for, the filling is all just made to taste.

IMG_3374


Torta de Liquidificador
(Chicken Blender Pie)


Ingredients for dough:
1 and 1/4 cups milk
1/2 cup of water
2 tablespoons of baking powder
1 cup of oil
2 eggs
1/2 teaspoon salt
2 cups of flour

Ingredients for filling:
Leftover chicken (or 1 pound chicken breasts, cut into small cubes)
1 small onion, finely diced
1 small tomato, finely diced
Half a green pepper, finely diced
Garlic to taste
Olive oil
Salt and pepper to taste
Oregano to taste

Shredded cheese of your choice


Instructions:

Preheat your oven to 375 degrees.
 
In a sauce pan, add a little bit of olive oil, garlic and the diced onion.  Cook over medium heat until onion is translucent.  Add in the chicken, green pepper and tomato, and continue cooking until tomato is soft and chicken is cooked through.  Next, add in the spices, adjusting to taste, and lastly the cream.

Set aside.

Add the dough ingredients to the blender, starting with the wet ingredients first, and then the dry.  Blend until well mixed.  You should have a creamy looking batter.

Grease a baking dish.  I use a 13 by 9.  Then pour in half of the batter, spoon the chicken mixture over it, evenly.  Sprinkle on shredded cheese (if you like more cheese add more, if you don't want as much, add only a little, and if you don't want cheese, feel free to omit it).

Then pour over the remaining batter and using a spoon, evenly spread it out.  

At this point, you can sprinkle on more cheese if you like.  I don't always do that, just depends what mood I'm in.

Bake for 50 minutes or until pie is cooked, and browned on the top.

{ Big Mac Sloppy Joes }

IMG_3368

I have been working on my new meal plan, for the next two weeks, and I have added a few recipes that are not only easy to make, but easy on the food budget too.  With prices going up so much lately, we're all trying to cut corners, continue feeding the family, but not able to buy like we used to.

I'm trying my best to cook from the freezer, fridge and pantry, and serving meals that are still delicious, and able to fill tummies as well.

These Big Mac Sloppy Joes, couldn't be easier to make, don't take a lot of ingredients and taste just like your local McDonald's Big Mac Burger.  It's also a fun twist on the well known sloppy joes.

Hope you enjoy!
 

IMG_3364

Big Mac Sloppy Joes
 
 
Ingredients 
 
Ground Beef Mixture 
1 1/2 pounds ground beef 
1/2 yellow onion , finely chopped 
1/4 cup hamburger pickles , chopped
1 teaspoon kosher salt
1/4 teaspoon coarse ground pepper
2 teaspoons Worcestershire sauce 
 
 
McDonald's Secret Sauce Recipe:
1 cup mayonnaise
1/4 cup French dressing
2 tablespoons sweet relish
1 tablespoon ketchup
1 teaspoon white vinegar
1/4 teaspoon onion powder
/8 teaspoon salt 
 
 
To Assemble (Double Decker):
8 hamburger buns , (with seeds)
2 cups iceberg lettuce , shredded
12 hamburger pickle chips
4 slices American cheese
 
 
Instructions 
 
Brown your ground beef halfway, about 3-4 minutes, in your large skillet then add in the chopped onions, salt, pepper and Worcestershire sauce. Cook the beef until fully browned, about 3-4 minutes, then add in the chopped pickles and stir. 
 
Mix the McDonald's Copycat Big Mac Sauce ingredients in a medium bowl and stir well. Add 1 cup of the secret sauce to the pan, reserve the rest for your buns. Cook 1 additional minute then serve on sesame hamburger bun using the stacking order below.  
 
Stacking order from the bottom up: 
Bun bottom 
Secret Sauce
Lettuce 
American Cheese 
Meat 
Bun Bottom 
Secret Sauce 
 Lettuce 
Pickles 
Meat 
Bun Top 


IMG_3366

Wednesday, March 23, 2022

Pao de Leite Condensado - Condensed Milk Bread

IMG_2830

I was having a craving for a sweet bread.  In Portugal we have a few sweet breads, with a special one for Easter called Folar.  The Folar usually contain hard boiled eggs in the center.
 

I will probably make one for Easter this year, and share the recipe with you here, as well.
 
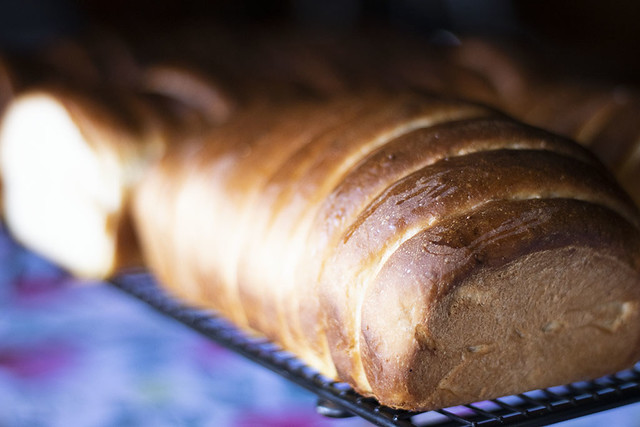
The recipe I'm bringing you today is for a condensed milk sweet bread, which is not only divine, but so easy to make as you use a blender for the liquids and then just mix with the flour and rest of the dry ingredients.  Before going into the oven to bake, you brush on a egg yolk and milk mixture, which in turn give it this beautiful brown color, and a distinct taste that is unbeatable.

IMG_2834
 
You can also turn these into rolls if you wish, but the fun part really is in the preparation, as you cut the dough into slices which in turn produce a loaf that is practically ready to cut.

This makes a delicious toast slathered on with butter, or you can make french toast, or a sandwich too.  If you like Hawaiian bread, you will love this one.
 
The recipe itself makes 3 or 4 loaves, depending on the size of the loaf pan you are using. 
 

Pao de Leite Condensado - Condensed Milk Bread
 
 
Ingredients
4 eggs
3 tablespoons butter (or  75 grams)
2 cups of milk (480 ml)
1 can condensed milk (395 grams)
3 tablespoons sugar (36 grams)
1 teaspoon salt (2 grams)
8 cups all purpose flour (1.120 kg)
Half a tablespoon Yeast (15 grams)
For glaze:
1 egg yolk
2 tablespoons milk


Directions:
In a blender, add the eggs, butter, milk and condensed milk, and blend until well incorporated.
 
In a separate bowl, add the yeast, sugar, flour and the salt.  Remember not to let the salt and yeast touch, so that the salt does not kill off the yeast.  I always add my yeast and my salt on opposite sides of the bowl.
 
Pour the contents of the blender into a big mixing bowl.  Then start adding the flour mixture, a cup at a time, mixing well after each addition.  When it becomes hard to stir, transfer the dough onto a floured surface and knead for about 10 minutes, until smooth but still slightly tacky.  
 
Transfer into a well oiled bowl, cover with plastic wrap and a dish towel, and let rise for an hour or until doubled in size.
 
Punch dough down, transfer to a floured surface and cut into 4 or 3 equal parts (depending on the size of your loaf pans or if you're making 3 or 4 loaves).
 
Take each dough ball and roll out into a rectangle, do not roll too thin.  Then start rolling the dough back up, as if you were making cinnamon rolls, pinching the seam at the bottom and both sides.  I just take both sides of the dough on each end and pinch to close.  

Next, take a dough cutter or a big knife, and divide the roll of dough into equal parts.   I usually cut in half, then half again and half again, etc.  It doesn't really matter how many parts you cut it into, obviously the more cuts you make the thinner the slices will be.  I did 16 slices in each loaf, so I cut the dough into 16 equal parts.

Next, carefully lift the whole loaf up, keeping the slices together, and place into the loaf pan.

Do the same with the remaining dough balls.

Cover with a kitchen towel again and let rise for another hour or until it has doubled in size.

Preheat the oven to 355 degrees.   In a small bowl, mix together 1 egg yolk and 2 tablespoons milk.  Brush over the prepared loaves, and then bake in the oven for 16 to 18 minutes or until brown and cooked through.  Just keep an eye out, obviously each oven is different.

Once the loaves are out of the oven, brush each with a little butter, remove from pan and let cool completely.
 
I keep my bread in a ziploc bag, and usually as with all my other bread, I keep it in the fridge so it stays longer.  
 
Enjoy!!!!