Monday, October 18, 2021

Chicken Broccoli Divan

September 21, 2021

This is one of those easy weeknight meals, that you can get in the oven real quick.  It is filling, delicious, pretty sure your whole family will enjoy it, and when paired with a salad, it makes the perfect dinner.

Many people have made this dish, for many many years, and I think there are so many variations out there, but this specific recipe comes from Spend with Pennies.  There really is nothing to this dish, no extravagant ingredients, and everything is found in our pantry.

September 21, 2021
 
Chicken Broccoli Divan
 Source:  Spend with Pennies
 
Ingredients:
  • 1 ½ pounds fresh broccoli cut into bite sized pieces
  • 3 cups cooked chicken cubed
  • 1 ½ cups shredded cheddar cheese divided
  • ½ cup milk
  • cup sour cream
  • 10 ½ ounces can condensed Cream of Mushroom or chicken soup
  • ½ teaspoon each garlic powder onion powder, dry mustard and pepper
  • ¼ teaspoon seasoning salt

Topping

  • 3 tablespoons Panko bread crumbs
  • 1 tablespoon melted butter
 
  • Preheat oven to 400°F.
  • Place broccoli in a large pot boiling water and cook 2-3 minutes or just until tender crisp.  Drain well.
  • In a medium bowl, combine 1 cup cheddar cheese, milk, condensed soup, sour cream and seasonings.
  • Stir in broccoli and chicken and spread into a 3qt casserole dish (or a 9x13 pan).  Top with remaining cheese.
  • In a small bowl, mix the butter and bread crumbs. Sprinkle the topping over the chicken mixture.
  • Bake 18-20 minutes, or until the breadcrumbs are lightly browned and the mixture is bubbly and hot.
  • Serve over rice, noodles, or mashed potatoes, as desired.

September 21, 2021


Italian Beef and Sausage Pie

IMG_1483

Meat, cheese, in the form of a pie.  That is basically my definition of a perfect meal.  I'm an easy to please gal, meat and potatoes, cheesy, bacon, whatever, and if it is shaped like a pie even better.
 
I came upon this recipe one night, while browsing different food blogs.  I immediately thought, that has to go on the menu, and very soon.  
 
It did not disappoint.  I made it a few days after bookmarking the recipe, and oh my goodness, was it delicious.  It was really easy to throw together, it was filling, and we got to enjoy some leftovers too. 

  IMG_1484

Italian Beef and Sausage Pie
Source:  A Family Feast 
 
 
Ingredients:
Vegetable shortening or butter to grease a 9-10 inch spring form pan (pan should be at least 2 ½ inches deep)
3 tablespoons extra virgin olive oil, divided
1 pound ground beef
½ pound Italian sweet sausage removed from casing
1 large sweet onion, diced into large half inch pieces, about 2 ½ cups
1 large green Bell pepper, diced into large half inch pieces, about 2 cups
1 teaspoon dry basil
1 teaspoon dry oregano
1 teaspoon kosher salt
½ teaspoon freshly ground black pepper
Pinch red pepper flakes
2 tablespoons fresh garlic, minced
2 tablespoons tomato paste
 
Batter
3 large eggs
1 cup Greek full fat yogurt
½ teaspoon kosher salt
1 ½ teaspoons baking powder
½ cup all-purpose flour
 
Other
1/2 cup grated Parmesan cheese
¼ pound provolone cheese sliced
1 large bunch scallions diced, about one cup
1 ½ cups mozzarella cheese, shredded

Instructions

Preheat the oven to 350 degrees F. with rack in center of oven.

Open a 9-10 inch springform pan and lay a piece of parchment over then snap the ring over so that the parchment covers the bottom and gets held in place by the ring. Use scissors to cut the outside parchment overhang. You should now have a round piece of parchment tightly held in place at the bottom of the springform pan.

Use vegetable shortening or butter and grease the bottom parchment and inside ring sides. Set the pan aside for now.

In a large saute pan, place two tablespoons of olive oil and over medium high heat and brown the beef and sausage meat. Pour into a strainer but save the liquid. Pour the liquid into a glass and remove and discard the fat that floats to the top with a spoon but save the liquid for later in the recipe.

In the same pan over medium heat, add the last tablespoon of olive oil and add the onions, peppers, basil, oregano, salt, pepper and pepper flakes and cook for about four minutes or until the vegetables are no longer crunchy but are still firm.

Add the garlic and cook one minute.

Make a space in the center and add the tomato paste and cook one minute.

Stir in two tablespoons of the reserved meat liquid and add all of the cooked meat and stir to combine. Set aside for now.

In a medium bowl with a whisk, beat the eggs then add the yogurt, salt, baking powder and flour and whisk to combine. The batter should resemble pancake batter.

Pour half of this batter into the bottom of the prepared springform pan and spread to the edges.

Add in half of the cooked beef mixture, again, spreading to the edges.

Sprinkle on all of the Parmesan then layer on all of the provolone cheese, overlapping the slices.

Add the remaining meat on top of the provolone and spread to the edges.

Add the scallions and mozzarella to the remaining batter and spread this mixture all over the top, spreading to the edges.

Cover a medium sheet tray with foil and place the pie in the center and bake 45 minutes. Spring form pans are notorious for leaking so the foil lined pan will save your oven from drips.

After 45 minutes, brown under broiler if the top needs it. I broiled ours for two minutes to brown the top further than it was.

Let sit 10 minutes in the pan.  If you press lightly on the center, it should feel firm like a quiche would feel when baked. If not, let sit five more minutes.

Run a small sharp knife around the inside edges to loosen.

Release the spring form outer ring then cut into eight pieces using a sharp serrated knife to cut through the top layer then down through the pie.

Serve hot.

 IMG_1486

Nectarine Brown Sugar Jam

IMG_1625

We've reached the time of year that I absolutely love.  I go into turbo mode gathering all the garden has given us, and try to can or freeze as much as possible, to make use of everything, but also to have extra in our pantry and root cellar, for the winter months.
 
I had recently bought a bunch of nectarines, but for some reason, my family wasn't eating them and they were starting to go bad.  I wasn't about to lose all that gorgeous fruit, so I turned it into a delicious Nectarine and Brown Sugar Jam, that is so perfect for this time of year.
 
Can't even tell you how delicious it is spread on toast or a warm biscuit.   

  IMG_1624

Nectarine Brown Sugar Jam


4 pounds nectarines as purchased (about 8 very large nectarines, to yield 3 1/2 pounds prepared fruit)
1 1/2 cups lightly packed light brown sugar 
1 cup granulated sugar 
4 tbsp freshly squeezed lemon juice 
1/2 teaspoon cinnamon 
1/4 teaspoon ground dry ginger 
 
 
Wash and stem nectarines, but don't peel. Remove the nectarine pit and rough chop the nectarine fruit. You should have 3 1/2 pounds of prepared nectarines after the fruit has been taken off the pit. 
 
Add the nectarines, brown sugar and granulated sugar to a large, wide, non-reactive pot. Bring to a simmer over medium-high heat, stirring often so the nectarines don't scorch. Cook the nectarines until they are soft and surrounded by a juicy sugar syrup, about 10 minutes. If you prefer a smoother textured jam, break up any large pieces of fruit with a potato masher, whisk, or fork at this point. Add the lemon juice, cinnamon and ginger to your jam. 
 
Continue to cook, stirring often, until the jam reaches the gel point. Turn heat under the jam to low, then quickly ladle the jam into clean, hot jars, leaving a 1/4 inch headspace. Remove air bubbles, adjust head-space and wipe jar rims carefully. Lid your jars according to manufacturer's directions, then transfer your jars to your canner. 
 
Process jam ten minutes at a full boil. While jars are processing, set a kitchen towel on the counter in a draft free place. After jars have processed, turn off the heat under your canner and allow the jars to sit in the canner for 5 minutes. 
 
Remove the jars and set on the kitchen towel. Jars should begin sealing almost immediately - you'll hear a sharp ping! as they seal. 
 
Leave jars alone for 8 to 12 hours to fully cool and set their seals, then check seals. Transfer any jar that hasn't sealed to the refrigerator and use it within 3 weeks. 
 
Store remaining jars at cool room temperature away from direct light. Jam is best used within a year. 
 
IMG_1623
 
 IMG_1621

Immune Booster Grapefruit and Lemon Drink

IMG_1702

For many years, I have made a Winter Tea mix for my fridge.  It's just honey, lemon slices and ginger slices, all layered in a mason jar, and kept in the fridge.  You add about a tablespoon or two to tea, and it helps a lot with colds and flus.
 
This is another variation, but not to be used in tea, although you probably could put a spoon into yours, but it's meant to be taken as is.  
 
It is another amazing immune boosting drink that will get you through the winter season, and all the sniffles and colds.
 
Super easy to make.  Just dump everything in a slow cooker and cook on HIGH for 4 hours. 

IMG_1706

Sliced grapefruit and lemon, as well as cinnamon sticks and ginger, plus the added benefit of tonic water with quinine.
 
What you get is a powerful immune booster that knocks all the crud out super quick.

IMG_1709 IMG_1712 IMG_1713

I keep a big mason jar in the fridge, it lasts about a month, and when one of us has the sniffles or starts feeling like we're getting a cold, we take a tablespoon.  Repeat it a couple times during the day, and within a day or two, the sickies are gone.
 
Now, this makes enough of a batch, that I keep one mason jar in the fridge and another in the freezer for when needed.  

What exactly is needed to make this super immune booster?


3 grapefruits
3 lemons
2 cinnamon sticks
1 ginger root
2 bottles of tonic water, with quinine


Slice the grapefruits and lemons into quarters, remove the inside and keep just the skins.  I usually take the inside of the fruit, chop it and freeze it to use in my water.

Chop all the skins into chunks and place in a slow cooker.

Add in two cinnamon sticks.  Wash and slice the ginger root, and add to the same pot.  Next, pour in two bottles of tonic water.

IMG_1724

Place the lid on, and cook on HIGH for 4 hours.  Do NOT remove the lid at any time to prevent the tonic water quinine from escaping through the steam.
 
Once it is done cooking, turn off the slow cooker, and allow to cool completely.  Again, DO NOT OPEN.
 
Once completely cool, discard the skins, cinnamon and ginger, and pour the liquid into a clean mason jar.  I like to add honey and mix it well, before pouring into the jar, just because it is quite bitter and the honey not only helps to sweeten it slightly but is also another great ingredient to fight off colds and flus.
 
 IMG_1719

Bolo Bem Casado - Well Married Cake

Bolo Bem Casado

Think of a divine cake, vanilla, spongy, soft, with this dulce de leche filling.  I think it may be one of the easiest cakes to make, but one of the most delicious you'll ever eat.

The name is quite funny, if you translate it word for word from Portuguese to English, it will mean Well Married Cake.  Yep!!!

Which I can understand because the cake layer together with the caramel flavor of the dulce de leche, makes the perfect combination.

Bolo Bem Casado

I have been trying to make more easy, different desserts, for our weekends.  For that purpose, I've been tapping into my Portuguese and Brazilian roots, and bringing to life favorite recipes from long ago.  

The kind that were passed down from generation to generation, or even the one dessert that you remember eating as a child.  

I have many that my great grandmother used to make for us, and I wish more than anything that she was still around to help me in the kitchen, and to continue sharing with me her experience, trust and tried recipes and so on.

I may not have her, but I do have many of her recipes.  Can't wait to bring them here to the blog and share them with you all.


Bolo Bem Casado

Bolo Bem Casado 


For the cake:
4 eggs
1 and a half cups of sugar
3/4 cup oil
1 teaspoon vanilla extract
1 and a half cups of all purpose flour
1 tablespoon baking powder
3/4 cup of water

For the Dulce de Leche:
I cooked a can of condensed milk (please look online on how to do it, I used my instant pot for mine)
 
For the drizzle:
1 cup water
1 cup sugar
1 teaspoon vanilla extract


Beat the eggs with the sugar until soft and pale yellow.  Add in the oil, vanilla and beat well for another minute.  Next, add in the flour, baking powder and water, and combine until well incorporated.

Pour into a greased 13 x 9 inch pan.    Bake in a 350 degree oven for 35 to 40 minutes, until golden brown and a toothpick inserted in center, comes out dry.

Remove from oven and set aside until completely cooled.  Then remove from pan, and slice in half to create two layers.

Place one of the layers back in pan, then spread the cooked condensed milk (dulce de leche) over it.  Top with the remaining layer.

In a small saucepan, add the water, sugar and vanilla extract.  Mix well and then bring to a boil, and simmer for 10 minutes.  Remove from heat.   Drizzle onto the cake, making sure to cover it well, then pour any remaining syrup into the sides of the pan so the cake absorbs it.

Sprinkle on powdered sugar.  Enjoy!!!


Tuesday, September 14, 2021

Cheesy Garlic Monkey Bread

IMG_1378

We eat quite a bit of pasta around here, and yes I know that's not always the healthiest, but it is the cheapest to make, it stretches, it feeds a lot and with prices going up and up lately, it's easy on the budget.

One of our favorite side dishes when eating pasta, is the ever popular garlic bread.

But I don't always want to eat the same, and sometimes I crave something a little different.  This recipe came about when I was trying to figure out what to make with our ravioli last week.  I started by making my usual pizza dough, and thought about making a focaccia but wasn't in the mood for that.

IMG_1377
 
I sat around for a bit and then thought, well why not just make some sort of monkey bread but garlic cheese and that way people can just rip off pieces.  It will be fun and tasty.  So that is what I did.

The result was this really yummy fun garlic cheese monkey bread.  The hubby and kids loved it and it's now a favorite around here.

IMG_1373

Cheesy Garlic Monkey Bread
 
 
Ingredients
Mozzarella cheese, cubed
Melted Butter
Parmesan Cheese
Italian Seasoning
 
 
Make the pizza dough, then break off small balls of dough, flatten slightly, add some cubed mozzarella cheese and close, making sure to pinch the seams.
 
In a small bowl, melt the butter, and add italian seasoning and some parmesan cheese.  Mix well.
 
Roll the dough balls in the melted butter, and then add to a greased bundt pan.
 
Bake at 375 for 25 minutes or until browned and the dough is cooked all the way through.  Invert onto a plate, and serve immediately.

German Pizza - Flammkuchen

IMG_1398
 
The first time I heard of German pizza was a couple years ago.  I intended to make it and then never got around to it, and actually completely forgot, until I was scrolling through my blog a couple weeks ago, and there it was.  

Me, mentioning wanting to make it, but yeah....never got around to it.

So a few days ago, when I was trying to figure out what to make for lunch for myself and the kids, I remembered the German pizza and quickly threw it together.

IMG_1397
 
I will say, when I first saw the recipe I was a bit apprehensive, only because it's not the traditional pizza dough and the sauce is not pizza sauce either, it is yogurt and nutmeg.  Strange, not something I am used to, but I just went with it anyway.

Wow, am I glad I did.  What a delicious and easy pizza to make.  I wasn't sure the kids would like it, but they loved it too, so that's always a plus.

So, what exactly is Flammkuchen?

The dish was created by Germanic farmers from Alsace, Baden and the Palatinate who used to bake bread once a week. The Flammekueche was originally a homemade dish which did not make its urban restaurant debut until the "pizza craze" of the 1960s. A Flammekueche would be used to test the heat of their wood-fired ovens. - Wikipedia 

Do give this pizza a try, I know it's not the traditional tomato based sauce, but it's so good, you won't even miss it. 

IMG_1394


German Pizza (Flammkuchen) 
 
 
Ingredients 
 
For the Dough 
2 c unbleached all-purpose flour 
1/2 tsp salt 
1/2 cup of water 
2 Tbsp olive oil 
 
For the Toppings 
1 c crème fraîche, or 1 c Greek yogurt, or slightly over 1 c plain yogurt, strained (I used greek yogurt) 1/4 tsp nutmeg 
1/4 lb bacon, diced 
2 onions, halved and sliced thin 
ground black pepper 
Cornmeal 
 
 
Preheat your oven to 500F. 
 
 In a large bowl, mix together flour, salt, water, and oil. Mix until a dough begins to form, the turn the dough out onto a lightly floured surface and knead until it is soft and smooth, 3-5 min. Set the dough aside and cover it with a towel. 
 
 In a small bowl, mix together crème fraîche and nutmeg. Set aside. In a large sauté pan, sauté bacon over medium high heat, until it is cooked about halfway to crisp, 2-4 minutes. Remove the bacon (keeping the grease in the pan) to a paper towel lined plate. Set aside. 
 
Place the sliced onions into the hot bacon grease and sauté over medium heat, stirring occasionally, until caramelized, 10 min. Remove the pan from the heat. Roll and stretch the dough out into a rectangle, roughly 11x16 inches. 
 
Place the dough onto a large baking sheet that has been generously dusted with cornmeal. Layering bacon, caramelized onions, and creme fraiche on a thin crust for a classic German Flammkuchen recipe. Spread the crème fraîche mixture over the crust, leaving just a little bare crust border. 
 
Distribute the caramelized onions over the crème fraîche, and sprinkle the bacon over the onions. Finish everything off with a dusting of black pepper. 
 
Place the baking sheet with the pizza into the oven and bake for 15-20 minutes, until the pizza is crisp and the edges are starting to darken. Remove from the oven, cut, and serve immediately. 
 
IMG_1396

Monday, September 06, 2021

Instant Pot Oatmeal

Instant Pot Oatmeal

Quick, creamy, delicious and perfect any time of year.  With this basic recipe you have a starting point to any variation, favorite flavors or all time favorites like brown sugar and cinnamon.
 
It's no secret that I love my Instant Pot and use it at least once a day.  If I can make it in there,  you better believe it's going in.  

When I learned how to make oatmeal for breakfast, it was like hitting the jackpot.  See, I don't like the oatmeal that comes in the little packets, to me it has to be homemade and creamy, and it's something I could never quite achieve with ready made.
 
Instant Pot Oatmeal

This instant pot oatmeal is so creamy and so delicious, you'll want to have it every morning.

Just a quick note.  You need to use old fashioned oats, but if all you have are quick oats, which is what I mostly have on hand, then you will need to cook it for just a minute and what I even do, is the minute it comes to pressure, I cancel it and do a quick release. 
 
If I don't, then I'll usually get the burn notice because the bottom will start to stick, not that it's a big deal, I still eat it just being careful not to scrape the burning parts on the bottom.

Instant Pot Oatmeal

Instant Pot Oatmeal 
 
 
Ingredients
1 and 1/2 cups old fashioned oats
1 and 3/4 cups of water
2 and 1/4 cups of milk
4 tablespoons brown sugar
Optional: you can add in dates, sliced bananas, blueberries, chopped apple.  Whatever you wish.  
 
 
Add the oats, water, milk and brown sugar to the instant pot.  Stir to combine.  Make sure it is set to seal, and then click the porridge button and set it at 6 minutes, then do a quick release.  You can also let it do a slow release, but don't let it go too long.
 
Serve immediately.


Saturday, August 21, 2021

Bolo Pudim (Pudding Cake )

IMG_1138
 
Every weekend, I try to make something special for the family.  Some sort of dessert that is just a bit more special, a little extra, so to speak.

It is usually when I'll pull out my Portuguese or Brazilian recipes, because though they have very simple desserts, they also some really yummy ones that have that little something special.  They also usually take a bit longer to make, so it's easier for me to dedicate more time to them.
 

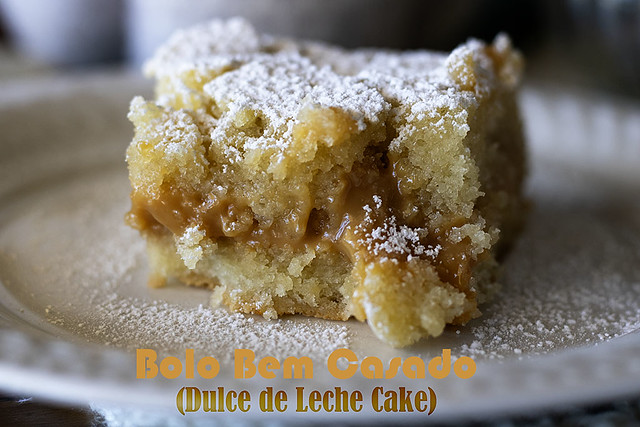
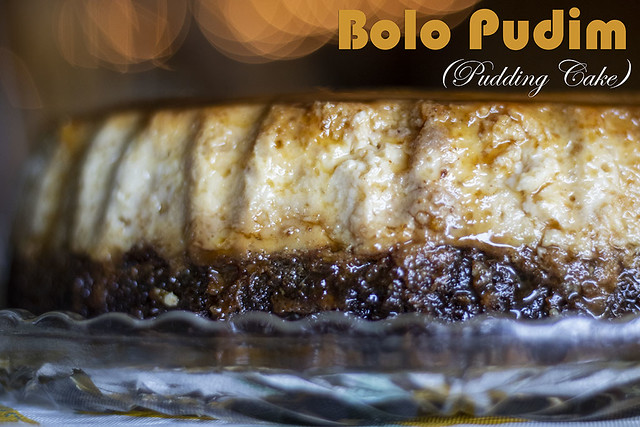
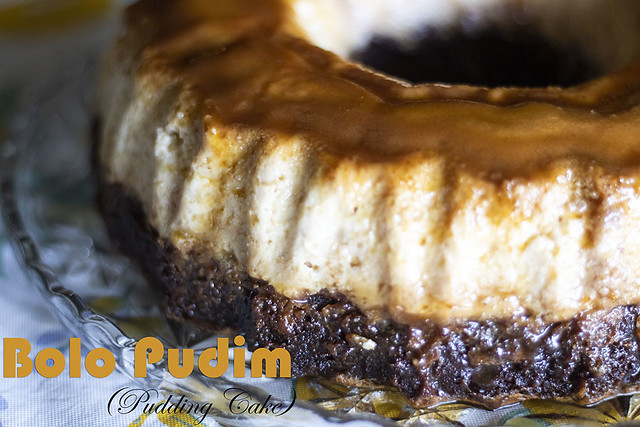
This one however, is absolutely delicious, simple and pretty quick and easy to make.  The result however is this amazing looking dessert that is half caramel pudding and half chocolate cake.  

How can you go wrong?
 
IMG_1142

This is a recipe that both Portuguese and Brazilians love, and it's not surprise.  It makes the perfect dessert for company, or that special occasion.  I've made mine with chocolate cake, but you can do a simple vanilla cake as well, if you prefer.  Totally up to you.  When I make a vanilla one next time, I'll share that recipe too.
 
Are you ready to wowed?  Alright, let's grab the cake pan, all the ingredients and get into the kitchen.
 
IMG_1139
 
Bolo Pudim
 
 
Ingredients
For the caramel:
1 cup of sugar
 
For the pudding:
4 eggs
1 can condensed milk
Same measure of can with whole milk
1 teaspoon vanilla extract
 
For the chocolate cake:
2 eggs
120 grams or 1/2 cup of sugar
136 grams or 1/2 cup of milk 
6 tablespoons of vegetable oil
6 tablespoons of cocoa powder
2 teaspoons baking powder
136 grams or 1 cup of flour


Preheat oven to 350 degrees F.  
 
In a big bundt cake pan, add the cup of sugar for the caramel.  Place on the stove, and turn the heat to low.  Let the sugar dissolve completely, and when done, using a spatula or silicone brush, brush the caramel all over the pan, making sure to go up the sides and up the middle hole of the pan as well.  

Set aside.

In a kitchenaid standing mixer, mix all the ingredients for the chocolate cake, and beat until well incorporated.  

Pour into the bundt cake pan, over the caramel and set aside.

In a blender, mix all the ingredients for the caramel pudding.  When done pour over the chocolate cake batter, try to do it slowly so it doesn't completely mix into the batter.  

Bake in the preheated oven for 50 minutes or until cake is done.  As the cake bakes, the chocolate cake will rise to the bottom as it is lighter than the pudding layer.  When done, remove from oven, cover the cake with aluminum foil, and place into a baking pan with sides.  Add about an inch and a half of hot water, and then place back into the oven for a further 20 minutes for the pudding to finish cooking.

Remove from oven.  Let sit for about 5 minutes, then put straight into fridge for about 4 hours, or you can place it in the freezer for an hour, until completely cold.

As the cake cools down, it will start pulling away from the sides of the cake pan.

The cake should be loose in the pan, if not, just run a knife carefully around the edges and the middle, then quickly invert onto a plate.  If there is any caramel left in the pan, you can place the pan over the stove again at a low heat to liquify the caramel, then pour it over the cake.

That's it.  All done.  Enjoy!!!


Monday, July 19, 2021

Glitter Grapes

July 19, 2021
 
I have always believed in using up what you have, and not letting things go to waste.  For example, when I meal plan, I often look to see if there will be leftovers from a specific meal, that I can use for the next night, or a few nights over.

Roast a whole chicken, count on having leftovers that can be made into enchiladas, or chicken salad.  

I also don't like throwing things away, so I'm always trying to use up what we have in the fridge.  If it is some sort of vegetable that I can freeze, then I do so.  If it's fruit I try to make a fruit salad or jam.

I had some grapes that needed eating up soon, before they went bad, and since we've been having such hot weather here, these were the best excuse to make some glitter grapes.

July 19, 2021 

Now if you've never had glitter grapes, you're probably thinking I've lost my mind. But I assure you, I haven't, and if you've never tried these, you really don't know what you're missing. They are so easy to make, and the good thing is that you can make as much or as little as you want, making it the perfect treat for a get together. 

July 19, 2021 

Glitter Grapes 
 
 
Ingredients: 
Grapes 
Jello powder (flavor of your choosing)
Sugar 
 
 
Directions: 
For every 2 cups of grapes, you need 1 tablespoon of jello powder and 2 tablespoons of sugar.  Mix well, then pour into a parchment or wax paper lined cookie sheet, and freeze.

If you want to keep them frozen or make a big batch that you won't eat right away, you can place them in ziploc bags or a freezer safe container.


July 19, 2021

Totchos

July 19, 2021
 
My husband is obsessed with nachos.  Of any kind, from anywhere, and he is even known to go into the kitchen late at night, grab some tortilla chips, throw on some shredded cheese, nuke it and enjoy that, like it's the best thing in the world.

I'm not in any way dissing on nachos, but I have to say that for me, potatoes trump everything else.  Give me potatoes in any way, shape or form, and I'll be a happy girl.

July 19, 2021
 
So these totchos, are my absolute favorite as a quick lunch, even a summertime dinner when you're not too hungry but are looking for something simple and delicious to fill your tummy.

They couldn't be easier to make, and you can add whatever toppings you want.

I kept these pretty simple, but I think next time I may kick them up a notch and see what happens.

July 19, 2021
 
Totchos

 
Ingredients:
1 (32 oz) bag of tater tots
1 cup sour cream
1 cup ranch dressing
Shredded cheese
Crumbled bacon
Green onions


Directions:
Bake your tater tots according to package directions.  In the meantime, combine the sour cream and ranch dressing.
 
When done, pull out of the oven, and spread on the sour cream mixture.  Add the shredded cheese, bacon and green onions and return to oven for a few more minutes, just until cheese starts to melt.

Serve immediately.

Thursday, June 24, 2021

Bang Bang Chicken Kabobs

Bang Bang Chicken Kabobs 

It's been years since I've made kabobs. It's not something I make a lot, and thankfully I had some skewers left over for this meal. Just shows you how long it's been since I've bought wooden skewers. 

But while looking through some food blogs a few weeks back, I came upon this recipe and knew I had to make it.  It's summer time, I love using my grill and this is the perfect meal to throw on, and get on the table in no time.
 
 Bang Bang Chicken Kabobs 
 
So where does Bang Bang Chicken originate? 
 
It is a typical street food sold in the Szechuan Region in China.  Basically the sauce is made of mayonnaise, sweet chili and sriracha.  It is delicious and really easy to make.

This meal came together pretty quick, aside from the hour that I left the chicken marinating in the fridge, everything else was quick and in no time we had a delicious summer meal on the table.

By the way, if you don't have a grill, or can't grill for some reason, you can pop these in the oven, I would say maybe at 375 F, until done, then just turn on the broil to give it a nice charred look.

Bang Bang Chicken Kabobs 
 
Bang Bang Chicken Kabobs 


Ingredients 
Boneless skinless chicken breasts, cut into 1 inch pieces
2 tbsp mayonnaise
4 tbsp sour cream 
1 tsp mustard 
1/3 cup sweet chili sauce 
1/2 tsp sriracha 
1 tsp honey 
Wooden skewers


Instructions 
Soak the wooden skewers for at least 10 minutes, to prevent burning.
 
In a big bowl, mix together the mayonnaise, sour cream, mustard, sweet chili sauce, sriracha and honey.  
Add the chicken cubes, and stir well to combine.  Cover with plastic wrap and place in the fridge for about an hour.  
 
Add the chicken pieces to the wooden skewers.  Preheat your grill, make sure to brush on some oil on the grates so the chicken won't stick.  
 
Cook about 5 or 6 minutes on each side, until cooked through.  
 
Drizzle on any remaining sauce over the chicken, and serve immediately. 
 
 
Recipe adapted from:  4 Sons 'R' Us
 
Bang Bang Chicken Kabobs

Knock your socks off Burgers

Knock your socks off burgers 

I love a good burger. To me, there is nothing like it. 
 
The messier, the juicier, the bigger the mess on your hands, the better the burger, in my opinion. 
 
But as much as I love burgers, I often tend to not finish mine.  My greatgrandmother used to say "Tens mais olhos que a barriga."
 
Which meant "you have more eyes than stomach.".  
 
I couldn't argue with her because she was 100% correct.  But then, in my defense, who of us hasn't bitten off more than they can chew, literally?
 
With the invention of the slider burgers, it took it all to a new level, because now I could enjoy my favorite burgers a little at a time, and I didn't feel like I was wasting.
 

Knock your socks off burgers 

Also, I don't like burgers from one day to the next.  I don't mean burgers we throw on the grill and keep in a tupperware until the next day.  I am talking about ready made burgers, like sometimes my kids will eat half a burger and leave the other half for later.

I can't.  It just doesn't taste the same.  And maybe it's just me but every time I try to heat up a burger, I end up with a rock hard bun.  It's just gross to me.

Anyway, all this just to say that I love burgers, but I really REALLY love sliders. 

These are the perfect size burger, and you can make a huge batch if you have many mouths to feed, or a get together.

Knock your socks off burgers 

The sauce is definitely what makes these and I think that sauce would be divine over a steak.
 
Now if you don't like mushrooms, I suppose you could leave them out.  I actually picked out the mushrooms from my son's sliders because he dislikes them immensely.

Me on the other hand, I love mushrooms and a good mushroom sauce, and this one, is that and much more.

Knock your socks off burgers
 
Knock your socks off Burgers


Ingredients 
1 lbs. ground beef 
12 dinner rolls 
6 slices pepper jack cheese, cut in half 
mayonnaise 
 
Mushroom sauce 
8 oz. sliced mushrooms 
3 Tablespoons butter 
2 Tablespoons minced garlic or 
4 garlic cloves minced 
 ½ cup chopped onion 
1 Tablespoon Worcestershire sauce 
½ cup heavy cream 
 ½ cup beef broth 
 ½ teaspoon salt 
 ½ teaspoon pepper 
1 Tablespoon cornstarch 
2 Tablespoons cold water 
 
 
Instructions 
Preheat oven to 375 F.  Divide the ground beef into 12 small patties. 
 
Fry them in a cast iron skillet until cooked through and brown, remove from heat.
Remove them from skillet.
 
In another skillet, add the butter, mushrooms and garlic.  Saute for a few minutes.  Add in the  Worcestershire sauce, cream, beef broth, onion and salt and pepper.  
 
In a small bowl, mix the cornstarch with 2 tablespoons of water.  Slowly add to the mushroom and onion mixture, stirring constantly until thickened.  Remove from heat.  
 
Place the dinner rolls in a greased casserole dish.  Slice open, and spread mayonnaise on both sides.  Plate a burger in each bun, top with half of a pepper jack cheese slice.  Spoon on some sauce, and add the top bun.
 
Cover with foil and bake for a few minutes until cheese melts.  
 
Serve immediately!


Recipe adapted from: Chef in Training